| |
 Installation,
Manual, & Help: The installation for Illustrator 9.0,
as usual with Adobe products, is easy and quick. There is a hefty 435
page User Guide, as well as a Quick Reference Card that contains basic
information about tools and palettes, and shortcuts for using them.
Adobe also includes complete documentation in an HTML-based help system,
which covers all of the information in the User Guide plus keyboard
shortcuts, full-color illustrations, and other detailed information. Installation,
Manual, & Help: The installation for Illustrator 9.0,
as usual with Adobe products, is easy and quick. There is a hefty 435
page User Guide, as well as a Quick Reference Card that contains basic
information about tools and palettes, and shortcuts for using them.
Adobe also includes complete documentation in an HTML-based help system,
which covers all of the information in the User Guide plus keyboard
shortcuts, full-color illustrations, and other detailed information.
Enhanced Web Workflow: The program
offers a number of new and enhanced features to aid in the creation
of graphics for the Web.
- Pixel-based units and preview--Since
much of the vector artwork created in Illustrator will be rasterized
when used on the Web, it's useful to monitor your work in terms of
pixels. The Units &
 Undo
preferences panel lets you specify pixels as a global measurement
unit for sizing, editing, and laying out your graphics (see image
to the left for view of Preferences dialog box). You can also choose
the Pixe Undo
preferences panel lets you specify pixels as a global measurement
unit for sizing, editing, and laying out your graphics (see image
to the left for view of Preferences dialog box). You can also choose
the Pixe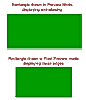 l
Preview to see your vector objects as they will appear in a Web browser.
When you work in Pixel Preview mode, objects will snap by default
to the nearest pixel edge in the document, which helps prevent anti-aliasing
on horizontal and vertical lines (see image to the right for view
of different display modes). This mode streamlines your Web production
as you no longer need to copy and paste paths into Photoshop to see
how they look as rasterized output; nor do you need to export raster
Web graphics, view them in different Web browsers, and then return
to Illustrator to make adjustments. Everything is done right in Illustrator. l
Preview to see your vector objects as they will appear in a Web browser.
When you work in Pixel Preview mode, objects will snap by default
to the nearest pixel edge in the document, which helps prevent anti-aliasing
on horizontal and vertical lines (see image to the right for view
of different display modes). This mode streamlines your Web production
as you no longer need to copy and paste paths into Photoshop to see
how they look as rasterized output; nor do you need to export raster
Web graphics, view them in different Web browsers, and then return
to Illustrator to make adjustments. Everything is done right in Illustrator.
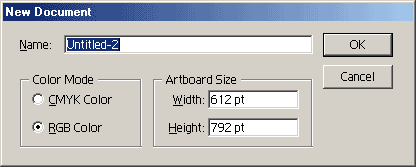
- RGB and Web-safe color support--Enhanced
color options let you work with documents in RGB mode and specify
Web-safe colors for painting. When creating a new document, you have
the
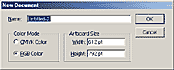 option
of setting the color mode to RGB (see image to left for view of dialog
box); you can also convert option
of setting the color mode to RGB (see image to left for view of dialog
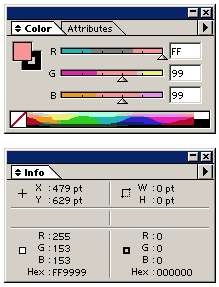
box); you can also convert 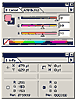 documents
to RGB mode. New options also make it easy for you to paint with the
subset of RGB colors that appear in the standard 216 color Web safe
palette. You can set the Color palette to display Web safe RGB sliders
that let you mix Web colors by dragging or by entering hexadecimal
values, and the Color Picker contains an Only Web Colors option that
automatically selects the nearest Web safe equivalent of the color
you pick. You can also set the Info palette to display the RGB or
hexadecimal values of colors in your work. (See image to right for
view of Web safe RGB sliders and Info palette.) It is great to have
all of these color options easily accessible. documents
to RGB mode. New options also make it easy for you to paint with the
subset of RGB colors that appear in the standard 216 color Web safe
palette. You can set the Color palette to display Web safe RGB sliders
that let you mix Web colors by dragging or by entering hexadecimal
values, and the Color Picker contains an Only Web Colors option that
automatically selects the nearest Web safe equivalent of the color
you pick. You can also set the Info palette to display the RGB or
hexadecimal values of colors in your work. (See image to right for
view of Web safe RGB sliders and Info palette.) It is great to have
all of these color options easily accessible.
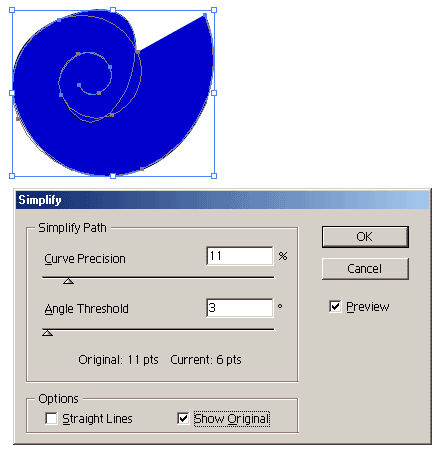
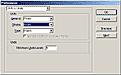
- Path simplification--You can
use the Simplify Path command to remove unnecessary anchor
 points
from selected paths without changing the shape of those paths. This
command produces smoother paths and smaller file sizes. The values
for curve precision and angle threshold can be set to specify how
closely the revised path follows the shape of the original path and
how cleanly it preserves corners. There is a preview option that lets
you see the results in the dialog box. (See image to the right for
view of dialog box with a preview. The red-brown outline indicates
the original path.) points
from selected paths without changing the shape of those paths. This
command produces smoother paths and smaller file sizes. The values
for curve precision and angle threshold can be set to specify how
closely the revised path follows the shape of the original path and
how cleanly it preserves corners. There is a preview option that lets
you see the results in the dialog box. (See image to the right for
view of dialog box with a preview. The red-brown outline indicates
the original path.)
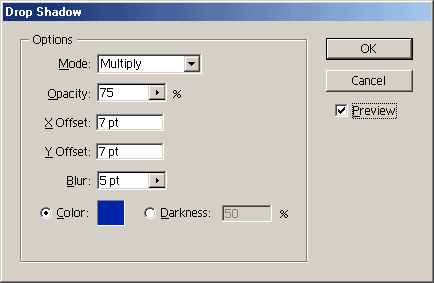
- Instant drop shadows, glows, and editable
shapes--The commands under the new Effects menu make it
easy to embellish your artwork and type with drop shadows and glows
to create flexible, editable buttons and banners. Drop shadows include
settings for x and y offset values, darkness, blur, and color. (See
image to left for view of drop shadow dialog box.) With glows, you
can set the effect to appear on the outside edge of
 an
object (outer glows) or on its interior (inner glows). Shadows and
glows will maintain transparency, and even support blending modes,
and you don't have to convert your Illustrator objects to rasters
before you can use these effects. Even after applying drop shadows
and glows, you can modify the underlying object freely, and change
the shape of an object, editing what it says (if it's a text object).
By using the live shapes feature in Illustrator 9.0, you can apply
rectangles, rounded rectangles, and ellipses to an
object (outer glows) or on its interior (inner glows). Shadows and
glows will maintain transparency, and even support blending modes,
and you don't have to convert your Illustrator objects to rasters
before you can use these effects. Even after applying drop shadows
and glows, you can modify the underlying object freely, and change
the shape of an object, editing what it says (if it's a text object).
By using the live shapes feature in Illustrator 9.0, you can apply
rectangles, rounded rectangles, and ellipses to 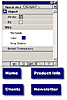 selected
text and other objects. You can choose whether its size is absolute
or relative. A shape with a relative setting will automatically grow
and shrink to accommodate changes to the other object. The live shapes
feature is so easy and fun to use, it seems sinful, and it is wonderful
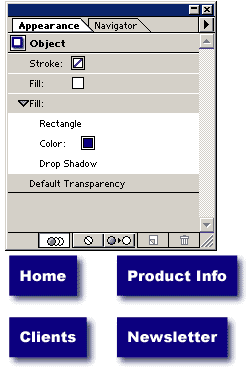
for those individuals who are indecisive when designing buttons. I
created the buttons in the image on the right using the drop shadow
effect and the live shapes feature. I started with different colors
and rounded rectangles and easily changed the colors and shapes after
the buttons were made. I quickly made the series of buttons by duplicating
the first one and then changed the text for the subsequent buttons.
The shape of each button expanded or contracted to fit the new text.
(The image to the right shows the buttons and the Appearance palette
which you use to work with live shapes.) selected
text and other objects. You can choose whether its size is absolute
or relative. A shape with a relative setting will automatically grow
and shrink to accommodate changes to the other object. The live shapes
feature is so easy and fun to use, it seems sinful, and it is wonderful
for those individuals who are indecisive when designing buttons. I
created the buttons in the image on the right using the drop shadow
effect and the live shapes feature. I started with different colors
and rounded rectangles and easily changed the colors and shapes after
the buttons were made. I quickly made the series of buttons by duplicating
the first one and then changed the text for the subsequent buttons.
The shape of each button expanded or contracted to fit the new text.
(The image to the right shows the buttons and the Appearance palette
which you use to work with live shapes.)
- Instant layer generation--The
Release to Layers command lets you quickly organize objects on separate
layers, a feature useful for preparing files for Web animation. For
instance, you could prepare different frames of an animation by first
applying blend options to objects or by using the scatter brush to
paint repeated copies of an object along a path. You could then release
each object in the blend or scattered path to a separate layer and
export the file as a Flash (SWF) file or to Adobe Photoshop to set
up the animation.
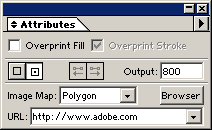
- Polygonal image maps--Illustrator
9.0 supports polygonal, as well as rectangular, image maps. A new
option in the Image Map menu in the Attributes palette lets you
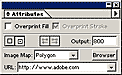 create
an image map with a polygon enclosing the selected object. By entering
a URL, you can have Illustrator automatically generate a linked polygonal
image map when exporting the file to a Web file format. You can test
that a URL is correct by clicking the Browser button in the Attributes
palette after you assign the URL. Illustrator will then launch your
default browser, log you on, and link you to the appropriate Web site.
(The image to the right shows the Attributes palette where you choose
the shape and enter a URL.) create
an image map with a polygon enclosing the selected object. By entering
a URL, you can have Illustrator automatically generate a linked polygonal
image map when exporting the file to a Web file format. You can test
that a URL is correct by clicking the Browser button in the Attributes
palette after you assign the URL. Illustrator will then launch your
default browser, log you on, and link you to the appropriate Web site.
(The image to the right shows the Attributes palette where you choose
the shape and enter a URL.)
Optimized Web Bitmap Export: The
new Save for Web command provides comprehensive yet easy-to-use controls
for previewing and exporting artwork files in bitmap form. Anyone familiar
with Photoshop 5.5 will recognize these features, and all the options
available in the Save for Web window work the same way as those in Photoshop
5.5, so you can apply what you know about one program in the other and
move between them easily. These features are an excellent inclusion
in the program and allow you to complete all of you work right in Illustrator,
if you want, rather than switch to Photoshop.
- Optimization controls--Illustrator
9.0 supports GIF, JPEG, PNG-8, and PNG-24 optimization formats for
reducing file sizes. You can choose the optimization format that's
appropriate for your image based on its colors and tonal range.
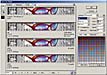
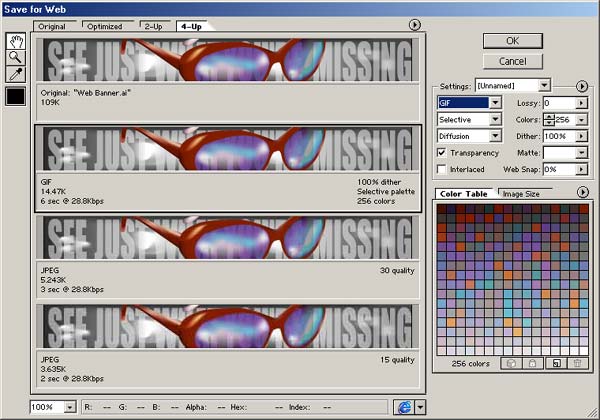
- LiveView panels with choice of 2-up or
4-up views--With Illustrator 9.0, you can look at an original
and optimized version in 2-up view, or an original image along with
three optimized variations in 4-up view. (See image to right for view
of Save for Web dialog box with 4-up view.)
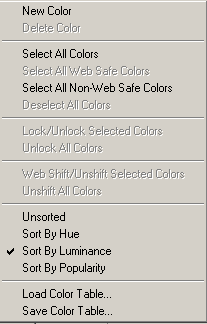
- Color controls--If you want
to reduce GIF or PNG-8 file sizes while maintaining image
 quality,
you can minimize the number of colors saved with an image by using
the controls in the Color Table tab. You can add, delete, edit, or
lock colors. Locking a color will ensure that the color will remain
untouched as you eliminate other colors. You are able to easily shift
colors to Web-safe equivalents, and also view RGB and hexadecimal
values for colors at a glance. (See image to left for view of color
options.) quality,
you can minimize the number of colors saved with an image by using
the controls in the Color Table tab. You can add, delete, edit, or
lock colors. Locking a color will ensure that the color will remain
untouched as you eliminate other colors. You are able to easily shift
colors to Web-safe equivalents, and also view RGB and hexadecimal
values for colors at a glance. (See image to left for view of color
options.)
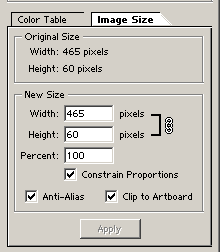
- Image size controls--The program
includes options for resizing graphics as you optimize
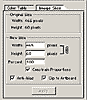 them.
You are able to specify a new height and width or reduce the image
size by a percentage. With the Constrain Proportions option, you can
ensure that the relative height and width remain the same. To export
only what's positioned on the artboard, you can choose Clip to Artboard
option. (See image to right for view of image size options.) them.
You are able to specify a new height and width or reduce the image
size by a percentage. With the Constrain Proportions option, you can
ensure that the relative height and width remain the same. To export
only what's positioned on the artboard, you can choose Clip to Artboard
option. (See image to right for view of image size options.)
- Preview controls--With the Save
for Web window, you can preview browser dither by selecting the Browser
Dither option from a popup menu, or by setting your computer display
to 8-bit and then previewing the optimized image in the Web browsers
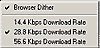 you specify. You can also check out the download speed for different
optimization settings at different modem speeds, and you can preview
the graphic in a Web browser by selecting it from a menu in the Save
for Web window. (See image to right for view of options for Browser
Dither and download rates.)
you specify. You can also check out the download speed for different
optimization settings at different modem speeds, and you can preview
the graphic in a Web browser by selecting it from a menu in the Save
for Web window. (See image to right for view of options for Browser
Dither and download rates.)
Flexible Web Vector Export: Illustrator
9.0 provides support for exporting files to Flash (SWF) format, as well
as to the new SVG Web vector standard. Both Web vector formats maintain
high-quality artwork and fonts, while producing smaller file sizes and
faster download times than bitmap formats.
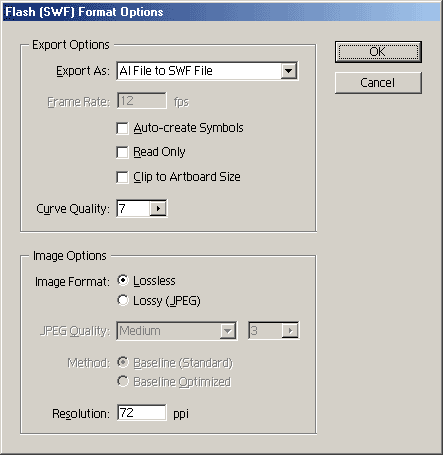
- Flash (SWF) format--Flash is
widely used to design vector-based Web pages and Web
 animations.
To export your Illustrator file to Flash format, you specify the Flash
(SWF) format in the Export dialog box, where you can choose whether
to export the entire graphic to a single SWF file; export each layer
to a separate frame in a single SWF file; or export each layer to
a separate SWF file. (See image to right for view of SWF Export dialog
box.) animations.
To export your Illustrator file to Flash format, you specify the Flash
(SWF) format in the Export dialog box, where you can choose whether
to export the entire graphic to a single SWF file; export each layer
to a separate frame in a single SWF file; or export each layer to
a separate SWF file. (See image to right for view of SWF Export dialog
box.)
- SVG format--Illustrator 9.0
has a variety of SVG export options available (See image to the left
 for
view of SVG dialog box). SVG is an emerging, open standard that was
developed by the World Wide Web Consortium (W3C) and numerous industry
players, including Adobe Systems, IBM, Netscape, Sun, Corel, Hewlett-Packard,
and others. This standard provides all the benefits of the Flash format,
plus support for the following features: Type 1 and TrueType fonts,
extensible markup language (XML), cascading style sheets for
view of SVG dialog box). SVG is an emerging, open standard that was
developed by the World Wide Web Consortium (W3C) and numerous industry
players, including Adobe Systems, IBM, Netscape, Sun, Corel, Hewlett-Packard,
and others. This standard provides all the benefits of the Flash format,
plus support for the following features: Type 1 and TrueType fonts,
extensible markup language (XML), cascading style sheets 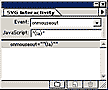 (CSS),
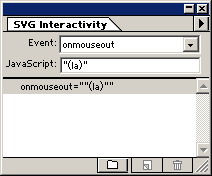
interactive actions, and dynamic HTML animation. When you prepare
SVG output, you can assign scripted events to objects using the SVG
Interactivity palette and then export that information with the file.
Illustrator also ships with the SVG Viewer plug-in, which works with
different browsers to play back SVG graphics and Web pages. For example,
you could use the SVG Interactivity palette to enhance your SVG output
by writing a JavaScript command that causes an object to display with
a glow effect when the mouse pointer moves inside the object boundaries.
(See image to right for view of SVG Interactivity palette.) Also to
see a wide range of examples of SVG in action, browse the SVG Developer
Preview on http://www.adobe.com/svg. (CSS),
interactive actions, and dynamic HTML animation. When you prepare
SVG output, you can assign scripted events to objects using the SVG
Interactivity palette and then export that information with the file.
Illustrator also ships with the SVG Viewer plug-in, which works with
different browsers to play back SVG graphics and Web pages. For example,
you could use the SVG Interactivity palette to enhance your SVG output
by writing a JavaScript command that causes an object to display with
a glow effect when the mouse pointer moves inside the object boundaries.
(See image to right for view of SVG Interactivity palette.) Also to
see a wide range of examples of SVG in action, browse the SVG Developer
Preview on http://www.adobe.com/svg.
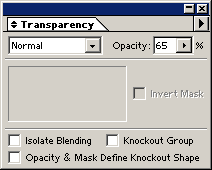
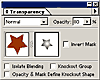
Versatile Transparency: The new
transparency capabilities in Illustrator 9.0 are flexible, versatile,
and robust.
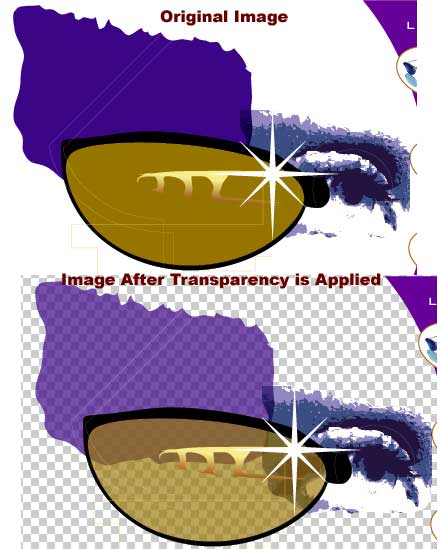
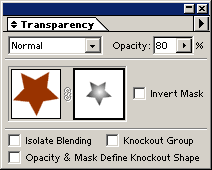
- Transparency palette--The new
Transparency palette allows you to apply transparency to any graphic
object, bitmap image, or type to partially or fully reveal underlying
objects. The
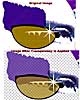  transparent
objects and type remains fully editable. (See the image to the left
for a view of the Transparency palette.) You simply select an object
and drag the Opacity slider or enter an opacity percentage to assign
the desired level of transparency. The Transparency palette displays
a thumbnail preview of the selected object. By displaying the checkerboard
transparency grid, you can monitor the opaque and transparent areas
of you image as you work. (See the image to the right for a view of
a graphic before transparency is applied and then the same graphic
after transparency is applied to the blue shape and to the glasses.
You can also see the transparency grid.) transparent
objects and type remains fully editable. (See the image to the left
for a view of the Transparency palette.) You simply select an object
and drag the Opacity slider or enter an opacity percentage to assign
the desired level of transparency. The Transparency palette displays
a thumbnail preview of the selected object. By displaying the checkerboard
transparency grid, you can monitor the opaque and transparent areas
of you image as you work. (See the image to the right for a view of
a graphic before transparency is applied and then the same graphic
after transparency is applied to the blue shape and to the glasses.
You can also see the transparency grid.)
- Flexible transparency targets--You
also have the option of limiting transparency to a layer,
 a group of objects, a knockout shape, or an object's stroke or fill.
To apply transparency to a group of objects or to a layer, you first
target the group or layer in the Layers palette, and then specify
an Opacity value. When you apply transparency to a layer as a whole,
the transparencies of the individual objects on the layer are not
affected. (See image to the right for view of the Layers palette where
you select a layer for transparency.)
a group of objects, a knockout shape, or an object's stroke or fill.
To apply transparency to a group of objects or to a layer, you first
target the group or layer in the Layers palette, and then specify
an Opacity value. When you apply transparency to a layer as a whole,
the transparencies of the individual objects on the layer are not
affected. (See image to the right for view of the Layers palette where
you select a layer for transparency.)
Blending Modes: Blending modes
let you blend the colors of graphic objects, type, and bitmap 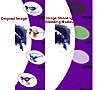 images
with underlying artwork. By experimenting with different blending modes
from the Transparency palette, you can create unique effects in the
overlapping areas of stacked objects. Illustrator 9.0 provides many
of the same blending modes offered by Photoshop. For the blending mode
image to the right, I used a section of the sunglasses image used above;
hid the Sunglasses layer; opened the Curved Edge layer and selected
all ovals; changed opacity to 70 percent; then selected different blending
modes on the Transparency palette for each oval. images
with underlying artwork. By experimenting with different blending modes
from the Transparency palette, you can create unique effects in the
overlapping areas of stacked objects. Illustrator 9.0 provides many
of the same blending modes offered by Photoshop. For the blending mode
image to the right, I used a section of the sunglasses image used above;
hid the Sunglasses layer; opened the Curved Edge layer and selected
all ovals; changed opacity to 70 percent; then selected different blending
modes on the Transparency palette for each oval.
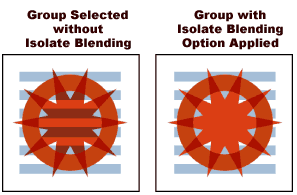
- Isolate Blending option--When
you apply a blending mode to a group, it usually has a visible affect
on any underlying objects as well. In some cases,
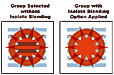 you
may want to isolate this to the group, so the underlying objects aren't
affected. You can use the Isolate Blend option on the Transparency
palette. When you select this option, the blending mode affects only
the interaction of colors in the group. (The image to the left shows
a group selected without Isolate Blending and the same group with
Isolate Blending option applied.) you
may want to isolate this to the group, so the underlying objects aren't
affected. You can use the Isolate Blend option on the Transparency
palette. When you select this option, the blending mode affects only
the interaction of colors in the group. (The image to the left shows
a group selected without Isolate Blending and the same group with
Isolate Blending option applied.)
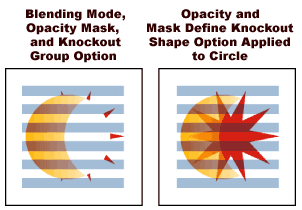
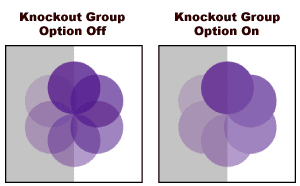
- Knockout Group option--With
the Knockout Group option on, the Transparency palette controls how
transparent objects in a group interact: when the option is selected,
the topmost
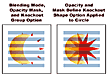 object
in the group knocks out the other objects in the group to reveal the object
in the group knocks out the other objects in the group to reveal the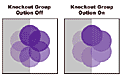 objects and layers below; when the option is deselected, all of the
objects in a transparent group show through the topmost object, along
with the other objects arranged beneath the group. (The image to the
left shows a group with Knockout Group option off and the same with
Knockout Group option on. The image to the right shows a circle with
blending mode, opacity mask, and Knockout Group option applied and
then with opacity and Mask Define Knockout Shape option applied to
a circle.)
objects and layers below; when the option is deselected, all of the
objects in a transparent group show through the topmost object, along
with the other objects arranged beneath the group. (The image to the
left shows a group with Knockout Group option off and the same with
Knockout Group option on. The image to the right shows a circle with
blending mode, opacity mask, and Knockout Group option applied and
then with opacity and Mask Define Knockout Shape option applied to
a circle.)
Masks: There are two new masking
features in Illustrator 9.0, opacity masks and layer clipping masks,
which allow you to selectively hide and reveal areas of your work through
custom shapes. By editing the shape, placement, and fill of the mask,
you can achieve special effects such as variable transparency across
an object.
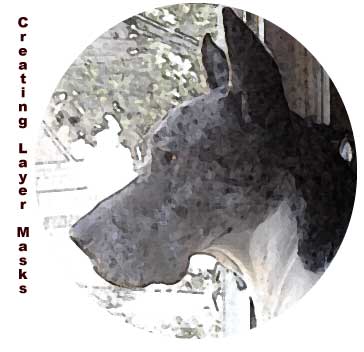
- Layer clipping masks--Layer
clipping masks let you clip what's visible on a layer. Any objects
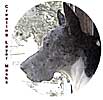 that
are subsequently added to the layer are also clipped by the mask.
Creating and removing layer masks is quick and easy. You just make
sure the clipping shape appears at the top of the layer (with the
object selected, choose Object > Arrange > Bring To Front).
Then you click the Make/Release Clipping Mask button on the Layers
palette. Anything that falls within the boundaries of the shape shows
through; everything else on the layer is hidden. Clicking the Make/Release
Clipping Mask button automatically releases the mask. (For the image
to the left, I used a scanned image of a dog; applied an oval mask;
then applied an effect to the image.) that
are subsequently added to the layer are also clipped by the mask.
Creating and removing layer masks is quick and easy. You just make
sure the clipping shape appears at the top of the layer (with the
object selected, choose Object > Arrange > Bring To Front).
Then you click the Make/Release Clipping Mask button on the Layers
palette. Anything that falls within the boundaries of the shape shows
through; everything else on the layer is hidden. Clicking the Make/Release
Clipping Mask button automatically releases the mask. (For the image
to the left, I used a scanned image of a dog; applied an oval mask;
then applied an effect to the image.)
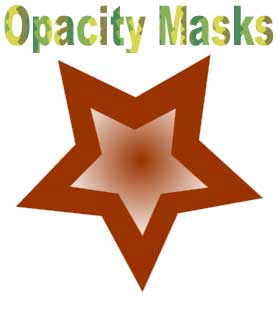
- Opacity masks--To create an
opacity mask, you layer two or more objects on top of each other,
select them, and click the Mask option on the Transparency palette.
The topmost object becomes the mask, and its grayscale values (luminosity)
affect what's visible in the underlying objects. For example, if you
made an opacity mask from a completely white object, the masked objects
would then be completely visible. If the opacity mask was black, the
underlying objects would completely
 disappear
where the opacity mask overlapped them. With a black-and-white gradient,
the masked objects would appear in the white-to-off-white areas and
disappear entirely where the gradient was black. Varying the transparency
of the opacity mask modulates its intensity. You can turn any object
into an opacity mask. Using patterns, gradients, and gradient meshes
as opacity masks can produce compelling effects. Text can serve as
an opacity mask, letting you quickly design text effects (plus, the
text remains editable). Opacity masks are easy to use in Illustrator
9.0. The Transparency palette displays thumbnails of the original
artwork and the mask, along with a link symbol. When disappear
where the opacity mask overlapped them. With a black-and-white gradient,
the masked objects would appear in the white-to-off-white areas and
disappear entirely where the gradient was black. Varying the transparency
of the opacity mask modulates its intensity. You can turn any object
into an opacity mask. Using patterns, gradients, and gradient meshes
as opacity masks can produce compelling effects. Text can serve as
an opacity mask, letting you quickly design text effects (plus, the
text remains editable). Opacity masks are easy to use in Illustrator
9.0. The Transparency palette displays thumbnails of the original
artwork and the mask, along with a link symbol. When  that
link symbol is fully visible, you can move the mask and the underlying
artwork as a unit anywhere in your document. If you click the mask
thumbnail, you can move or edit it independently of the underlying
artwork. You can even disable an opacity mask temporarily to view
and adjust its component parts. Checking the Invert Mask option in
the Transparency palette causes the underlying artwork to clip to
the shape of the masking object and reverses the grayscale effect.
You can undo any mask by selecting it and unchecking the Mask option
on the Transparency palette. (See the image to the left for view of
Transparency palette with thumbnail of mask. Also see the image to
the right for a view of a graphic and text made with a mask. The text
was created using the Invert Mask option in the dialog box.) that
link symbol is fully visible, you can move the mask and the underlying
artwork as a unit anywhere in your document. If you click the mask
thumbnail, you can move or edit it independently of the underlying
artwork. You can even disable an opacity mask temporarily to view
and adjust its component parts. Checking the Invert Mask option in
the Transparency palette causes the underlying artwork to clip to
the shape of the masking object and reverses the grayscale effect.
You can undo any mask by selecting it and unchecking the Mask option
on the Transparency palette. (See the image to the left for view of
Transparency palette with thumbnail of mask. Also see the image to
the right for a view of a graphic and text made with a mask. The text
was created using the Invert Mask option in the dialog box.)
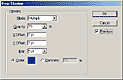
Feathering Effect:
The Feather command under the Effect > Stylize menu softens the transition
 between
foreground and background objects. As with other effects, the underlying
vector objects remain editable. In the Feather dialog box, you can specify
a feathering radius to control how text and path objects blend with
objects behind them. (See image to the right for view of feathering
effect applied to spiral and to rectangle behind text. You can get some
interesting results from using this option.) between
foreground and background objects. As with other effects, the underlying
vector objects remain editable. In the Feather dialog box, you can specify
a feathering radius to control how text and path objects blend with
objects behind them. (See image to the right for view of feathering
effect applied to spiral and to rectangle behind text. You can get some
interesting results from using this option.)
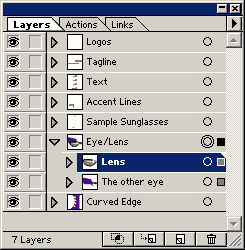
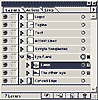
Layers Palette Enhancements: The
Layers palette has a number of display and ordering enhancements that
help you organize, rearrange, and monitor your work. There is the Release
to Layers command for automatically generating separate layers and clipping
masks for shaping the display of work. You have the ability to target
elements in the Layers palette as recipients of style and appearance
attributes.
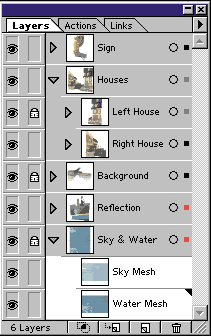
- Expanded nesting hierarchy--The
expanded Layers palette lets you organize your artwork in nested levels,
from top-level layers to individual objects. By nesting layers inside
other
 layers,
you can better monitor and organize documents that contain many layer
elements. You can collapse and expand the display of contents in a
layer or group, and you can rename, duplicate, or reorder any layer,
group, or object. It's easy to tell layers and sublayers from groups
and objects in the Layers palette list: a gray background appears
behind all layer and sublayer names in the palette list, while a white
background appears behind groups and objects. (See image to the left
for view of Layers palette.) layers,
you can better monitor and organize documents that contain many layer
elements. You can collapse and expand the display of contents in a
layer or group, and you can rename, duplicate, or reorder any layer,
group, or object. It's easy to tell layers and sublayers from groups
and objects in the Layers palette list: a gray background appears
behind all layer and sublayer names in the palette list, while a white
background appears behind groups and objects. (See image to the left
for view of Layers palette.)
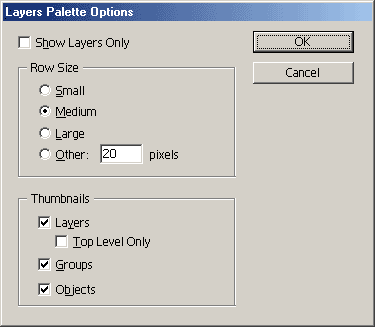
- Palette display options--To
help manage the screen space required to display the expanded Layers
palette, you can choose from a variety of alternate compact views.
For example, you can reduce thumbnail and row size, or you can temporarily
disable the display of objects and groups under the layer level. (See
image to the right for view of Layer Palette Options.)
Effects: Illustrator 9.0 introduces
a new concept, appearance, which refers to changing the look of objects
without changing the objects themselves. One of the chief ways you change
an object's appearance is by applying Illustrator 9's powerful new object
and layer effects. These live effects--including Photoshop compatible
filters, transformations, distortions, and more--alter the look of an
object without changing its underlying paths. You can then edit the
original paths (or edit the text if it's a text object), reorder the
applied effects, add and delete effects, or change effect parameters
in a few quick steps. Thus you can create a huge range of graphical
effects, and you don't have to start over every time you need to make
a change. When you apply attributes to a selected object, those attributes
are listed in the new Appearance palette. An appearance can include
any number and combination of live effects, fills, strokes, and transparency
settings. Furthermore, an appearance can be saved for on-going use as
a named graphic style in the new Styles palette.
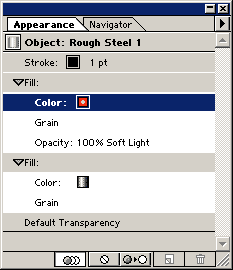
- Easy-to-update artwork--Object
and layer effects make it fast and fun to create variations on
  artwork.
You could design a distinctive logo using any combination of object
and layer effects; then change the effects applied or subtly alter
the underlying object without having to redo all of the steps involved.
Or you could make multiple copies of the logo and apply different
effects to each, without affecting the purity of the underlying paths
and text. (See image to the left for view of Appearance palette. See
image to the right for views of logos made within a few minutes using
live object effects.) artwork.
You could design a distinctive logo using any combination of object
and layer effects; then change the effects applied or subtly alter
the underlying object without having to redo all of the steps involved.
Or you could make multiple copies of the logo and apply different
effects to each, without affecting the purity of the underlying paths
and text. (See image to the left for view of Appearance palette. See
image to the right for views of logos made within a few minutes using
live object effects.)
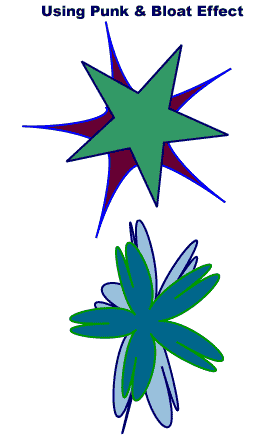
- Live Photoshop and third-party plug-in
filters--In the past, you had to rasterize artwork in
 order
to apply a Photoshop or third-party filter to it. Then, if changes
came up, you had to go back to the original artwork, make the change,
rasterize it again, and reapply the filter. Live object and layer
effects eliminate this process. Now you can apply live effects directly
(you need to choose from the Effect menu, not the Filter menu) and
then edit the underlying object or change the applied effect instantly.
For example, you could apply a mosaic effect to an object and then
edit the object's shape directly. (See image to right for view of
Punk & Bloat effect applied to stars. I started with one basic
shape, then copied and edited the shapes.) order
to apply a Photoshop or third-party filter to it. Then, if changes
came up, you had to go back to the original artwork, make the change,
rasterize it again, and reapply the filter. Live object and layer
effects eliminate this process. Now you can apply live effects directly
(you need to choose from the Effect menu, not the Filter menu) and
then edit the underlying object or change the applied effect instantly.
For example, you could apply a mosaic effect to an object and then
edit the object's shape directly. (See image to right for view of
Punk & Bloat effect applied to stars. I started with one basic
shape, then copied and edited the shapes.)
- Live effects and text--Live
object and layer effects work with text just as easily as with any
 other object. You can apply a series of live effects from the Effects
menu to text and then edit that text directly. For example, you could
distort and feather your text and then spell check it, edit its wording,
change its font, and perform other edits without starting over with
a new text block. (See image to right for view of live effects and
text.)
other object. You can apply a series of live effects from the Effects
menu to text and then edit that text directly. For example, you could
distort and feather your text and then spell check it, edit its wording,
change its font, and perform other edits without starting over with
a new text block. (See image to right for view of live effects and
text.)
- Editable outlined text--You
can use a live effect to turn text into outlines. Then anyone can
open, view, and print the file, regardless of whether they have the
fonts installed or whether they're using Illustrator or another program,
such as Adobe InDesign, to print the file. However, the text remains
completely editable for anyone who has the font installed. Now you
can avoid the font problems that often occur in file handoffs and
ensure smooth results.
Graphic Styles: In Illustrator
9.0 there is a new Styles palette that has various predefined styles.
You can create, edit, and save styles to this palette and even change
the default styles. Graphic styles streamline your design process by
creating a consistent, easy-to-maintain look for design clients or projects.
- Default styles--The Styles palette
contains a number of default graphic styles that can be
 applied
to objects instantly. To apply a graphic style, you select the target
object in your artwork, and then click the style swatch in the Styles
palette. You can adapt any of these predefined styles to your needs.
Renaming, duplicating, merging, and deleting styles are easy to do.
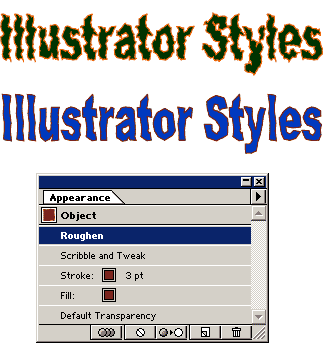
(The image to the left shows styles applied to text items. The first
one was made with a default style, while the second was made by editing
the Roughen and Scribble and Tweak options in the Appearance palette
for the default style.) applied
to objects instantly. To apply a graphic style, you select the target
object in your artwork, and then click the style swatch in the Styles
palette. You can adapt any of these predefined styles to your needs.
Renaming, duplicating, merging, and deleting styles are easy to do.
(The image to the left shows styles applied to text items. The first
one was made with a default style, while the second was made by editing
the Roughen and Scribble and Tweak options in the Appearance palette
for the default style.)
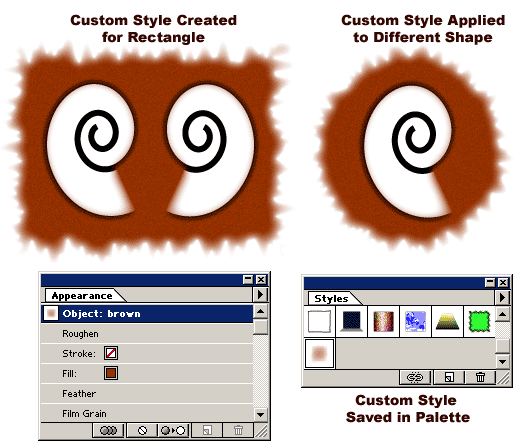
- Customizable styles--A graphic
style is a saved appearance. You set up the appearance by creating
an object; adding any number of fills and strokes; specifying parameters
for the object and layer effects you're applying; and setting transparency
for any of these attributes, or you
 can
specify combinations of attributes without creating an object first.
You then click a New Style button on the Styles palette to preserve
the selected appearance as a graphic style for on-going use. For example,
you could create a compelling line-pattern style by applying multiple
strokes to an object, assigning a color and live effect to each stroke,
and then saving the combination as a graphic style. (The image to
the right shows a custom style for the rectangle that I created and
then preserved in the Style palette. I then used the style on the
circle shape.) can
specify combinations of attributes without creating an object first.
You then click a New Style button on the Styles palette to preserve
the selected appearance as a graphic style for on-going use. For example,
you could create a compelling line-pattern style by applying multiple
strokes to an object, assigning a color and live effect to each stroke,
and then saving the combination as a graphic style. (The image to
the right shows a custom style for the rectangle that I created and
then preserved in the Style palette. I then used the style on the
circle shape.)
Integration with Photoshop, other Adobe Programs
and Web-design Programs: Illustrator 9.0 offers improved
integration with Photoshop. When opening a Photoshop file in Illustrator,
you can preserve masks, blending modes, and transparency, and convert
layers to separate Illustrator objects. When exporting an Illustrator
file to Photoshop format, you can preserve layers, opacity masks, transparency,
blending modes, and editable type. The many new and enhanced features
of Illustrator 9.0 make it an even more useful tool in the desktop print
publish workflow. The look and feel of the command menus, toolbox, palettes,
and keyboard shortcuts closely mirror the standard user interface common
to many Adobe programs. The native Illustrator 9.0 format is based on
PDF (Portable Document Format) at its core. As a result, when you export
artwork to a PDF file, you can choose to preserve the edibility of the
file when it is opened in Illustrator. That is, you can reopen an Illustrator-created
PDF file in Illustrator and make edits without losing file features
such as fonts, patterns, and vertical text. The Web workflow of Illustrator
9.0 makes it easier than ever to export files to other Adobe Web-design
programs such as GoLive 5 and LiveMotion. You can place native Illustrator
graphics directly in GoLive 5 files for efficient one-step optimization
to Web formats such as GIF, JPEG, PNG, SWF, and SVG. You can also bring
Illustrator artwork into LiveMotion for further animation, interactivity,
and sound enhancements.
Extra Goodies: Adobe products usually
ship with additional materials and Illustrator 9.0 is no exception.
Here is an overview of what is included with the program.
Adobe Illustrator 9.0 software, plus these other useful programs:
- Adobe Acrobat Reader 4.0 software for viewing PDF files.
- The latest Adobe PostScript printer driver for Windows or the Macintosh,
as well as a comprehensive set of PostScript Printer Description (PPD)
files.
- New Adobe SVG Viewer plug-in for viewing SVG pages from different
Web browsers.
- Tryout versions of Adobe Photoshop, Adobe InDesign, Adobe LiveMotion,
and other professional Adobe products.
Training and support materials, including:
- Adobe Illustrator 9.0 User Guide and Adobe Illustrator 9.0 Quick
Reference Card.
- Adobe Technical Notes and developer support information.
- A list of learning resources, including Adobe certified trainers,
service providers, and more.
Versatile artwork and other content, including:
- Premium Type 1 fonts.
- Illustrator extras, such as brush libraries, style libraries, action
sets, templates, and pattern libraries.
- Professional quality clip art, stock photos, and textures.
|
 Adobe
Illustrator 9.0: Adobe has just made Illustrator better
than ever. It is a well-rounded upgrade with new features or enhancements
for print, Web, or multimedia designers. It has new options such as the
Save for Web window that definitely helps you to be more productive and
efficient in the program. Many of the enhancements or new features also
reduce the steps involved in creating your artwork The addition of transparency
and blending options give you the option of designing all of your work
within a vector-based environment instead of going back and forth between
raster and vector programs, thus saving you time. Other options, though,
enable you to be more creative. The new styles are fun to use and allow
you to create artwork that will be consistent throughout a print project
or Web site. I found the Appearance palette and live effects useful, easy
to use, and get the creative juices running. So, should you spend the
money for this new upgrade? If you want to save time in creating your
artwork, the answer is yes! If you want to be more inspired by using a
program with a variety of easy to use and fun features, the answer is
yes!
Adobe
Illustrator 9.0: Adobe has just made Illustrator better
than ever. It is a well-rounded upgrade with new features or enhancements
for print, Web, or multimedia designers. It has new options such as the
Save for Web window that definitely helps you to be more productive and
efficient in the program. Many of the enhancements or new features also
reduce the steps involved in creating your artwork The addition of transparency
and blending options give you the option of designing all of your work
within a vector-based environment instead of going back and forth between
raster and vector programs, thus saving you time. Other options, though,
enable you to be more creative. The new styles are fun to use and allow
you to create artwork that will be consistent throughout a print project
or Web site. I found the Appearance palette and live effects useful, easy
to use, and get the creative juices running. So, should you spend the
money for this new upgrade? If you want to save time in creating your
artwork, the answer is yes! If you want to be more inspired by using a
program with a variety of easy to use and fun features, the answer is
yes! Illustrator
9.0, by Adobe Corporation, is a major upgrade. The new version
has: (1) robust, built-in Web graphics creation and optimization tools
so you can create and edit logos, buttons, line art, and other Web graphics
with greater flexibility and speed; (2) new transparency
Illustrator
9.0, by Adobe Corporation, is a major upgrade. The new version
has: (1) robust, built-in Web graphics creation and optimization tools
so you can create and edit logos, buttons, line art, and other Web graphics
with greater flexibility and speed; (2) new transparency  capabilities
so you can apply transparent effects to any object; (3) new creative
and productivity features such as object and layer effects, graphic
styles, customizable keyboard shortcuts, nested layers with thumbnails;
and (4) tighter integration with other Adobe products such as Photoshop,
InDesign, GoLive, and LiveMotion. Illustrator has been an excellent
product for working with vector graphics for print production, but with
its new Web features, it clearly is a powerful tool for anyone designing
vector or raster-based graphics for the Web. (If you are not familiar
with the program, you might like to look at our review of
capabilities
so you can apply transparent effects to any object; (3) new creative
and productivity features such as object and layer effects, graphic
styles, customizable keyboard shortcuts, nested layers with thumbnails;
and (4) tighter integration with other Adobe products such as Photoshop,
InDesign, GoLive, and LiveMotion. Illustrator has been an excellent
product for working with vector graphics for print production, but with
its new Web features, it clearly is a powerful tool for anyone designing
vector or raster-based graphics for the Web. (If you are not familiar
with the program, you might like to look at our review of  Beginning,
Intermediate, or Advanced Users. Anyone familiar with other
Beginning,
Intermediate, or Advanced Users. Anyone familiar with other

 Adobe
Illustrator 9.0--The new and enhanced features in this version
fall into four main categories:
Adobe
Illustrator 9.0--The new and enhanced features in this version
fall into four main categories: