If you're new to Adobe LiveMotion, you can learn the fundamental concepts
and features in the first 4 chapters. Thereafter, the chapters cover
animation, rollovers, etc. Although each lesson provides step-by-step
instructions for creating a specific project--with starting and ending
files to use and view--there are also three special review lessons where
you can use all the new techniques you have learned to create projects.
Getting Started--Gives you information
on how to install the Classroom in a Book files and fonts to your
hard disk.
Lesson 1: Getting to Know the Work Area--This
chapter gets you started in LiveMotion by showing you around the work
area. You explore the menus and palettes and viewing features. Learn
to open and save a file; select objects; move objects; use and rearrange
palettes; and preview compositions. It takes approximately 30 minutes
to complete, and there is a sample file on the CD to work with.
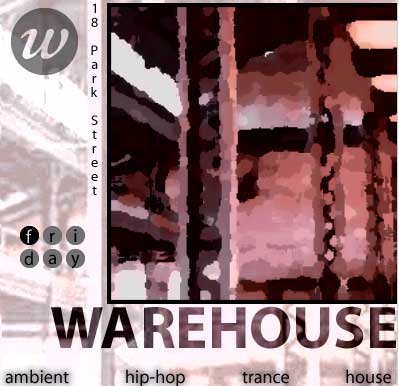
Lesson 2: Drawing Basic Shapes--In
this chapter you will learn  how
to create a logo and do the following: create shapes and layers; create
text objects; add effects and textures to shapes; change the size,
color, and opacity of shapes; and use various combine commands. It
takes about 45 minutes to complete, and there is a beginning and ending
file on the CD. See image to the right for a view of the logo.
how
to create a logo and do the following: create shapes and layers; create
text objects; add effects and textures to shapes; change the size,
color, and opacity of shapes; and use various combine commands. It
takes about 45 minutes to complete, and there is a beginning and ending
file on the CD. See image to the right for a view of the logo.
Lesson 3: Working With Type--In
this chapter, you will learn how to use the type tool;  create,
save, and apply a style; create a group mask; edit text; change the
alignment of text; use the combine commands; and use a Photoshop filter.
This lesson has you make a Web page, and it takes about 60 minutes
to complete. There is a beginning and ending file on the CD. See image
to the right for a view of the Web page.
create,
save, and apply a style; create a group mask; edit text; change the
alignment of text; use the combine commands; and use a Photoshop filter.
This lesson has you make a Web page, and it takes about 60 minutes
to complete. There is a beginning and ending file on the CD. See image
to the right for a view of the Web page.
Lesson 4: Working With The Pen Tool--You'll
learn how to do the following: draw straight lines; draw cured lines;
add and remove control points; convert smooth points to corner points
and vice versa; change shapes to paths; create closed paths; adjust
lines; and use the fill and outline features. You draw a bird, and
it takes about 45 minutes to complete and there is a beginning and
ending file on the CD.
Review A--In this first review
section, you use the techniques you learned in the first four lessons
to create a greeting card. You use the tools and palettes to create
objects, such as a red heart, a greeting, and flowers; modify them;
and create effects. Then you use masking to complete the project.
There are files on the CD to work with. See image to the right for
a view of a sample greeting card.
lessons
to create a greeting card. You use the tools and palettes to create
objects, such as a red heart, a greeting, and flowers; modify them;
and create effects. Then you use masking to complete the project.
There are files on the CD to work with. See image to the right for
a view of a sample greeting card.
Lesson 5: Animating Position--This
chapter discusses how to do the following: create  an
object to animate; name the object; display and work with the animation
Timeline window; create and edit keyframes; animate an object's position
and other properties; create and edit motion paths; replace one object
in an animation with another from a different file; and preview and
export an animation. It takes about 45 minutes to complete, and there
are sample files on the CD. See image on the left for a view of the
animation.
an
object to animate; name the object; display and work with the animation
Timeline window; create and edit keyframes; animate an object's position
and other properties; create and edit motion paths; replace one object
in an animation with another from a different file; and preview and
export an animation. It takes about 45 minutes to complete, and there
are sample files on the CD. See image on the left for a view of the
animation.
Lesson 6: Editing Keyframes--In
Lesson 5, you learn how to animate an object's position, but in this
lesson, you will learn how to create more realistic, complex movement
 by altering keyframes and repositioning objects. You learn to: create
hold frames; ease in and ease out of frames; reverse animations by
moving keyframes; and change the stacking order of objects.You create
an animation that consists of a purple plane that flies to three different
cites, as a cloud drifts across the scene. It takes about 30 minutes
to complete, and there are beginning and ending files on the CD to
work with. See image to the right for a flattened view of the animation.
by altering keyframes and repositioning objects. You learn to: create
hold frames; ease in and ease out of frames; reverse animations by
moving keyframes; and change the stacking order of objects.You create
an animation that consists of a purple plane that flies to three different
cites, as a cloud drifts across the scene. It takes about 30 minutes
to complete, and there are beginning and ending files on the CD to
work with. See image to the right for a flattened view of the animation.
Lesson 7: Animating Object Properties--Using
LiveMotion, you can animate nearly 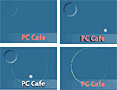 any
aspect of an object. You can also make objects appear and disappear
during an animation. In this lesson you learn to: animate multilayered
objects; change color, object opacity, and layer opacity over time;
and work with sound. The lesson takes about 45 minutes to complete,
and there are beginning and ending files on the CD. See the image
to the left for a flattened variation of the finished project. See
our review of LiveMotion
for a Flash version.
any
aspect of an object. You can also make objects appear and disappear
during an animation. In this lesson you learn to: animate multilayered
objects; change color, object opacity, and layer opacity over time;
and work with sound. The lesson takes about 45 minutes to complete,
and there are beginning and ending files on the CD. See the image
to the left for a flattened variation of the finished project. See
our review of LiveMotion
for a Flash version.
Review B--In this second review
chapter, you use the techniques you learn in Lessons 5  through
7 to create an animated winter scene. You make elements of the animation
move, rotate, and loop. You then add a song that will play through
the animation. The files you need to work with are provided on the
CD. See image to the right for a flattened view of the finished project.
through
7 to create an animated winter scene. You make elements of the animation
move, rotate, and loop. You then add a song that will play through
the animation. The files you need to work with are provided on the
CD. See image to the right for a flattened view of the finished project.
Lesson 8: Creating Basic Rollovers--In
this chapter, you learn to: create multiple rollover buttons; apply
different layered effects to a button; create a rollover state for
each layered effect; apply a sound effect to a rollover state; add
a behavior to a rollover state; and add a label to each button. The
lesson takes about 30 minutes to complete, and there is an end file
on the CD to view.
Lesson 9: Creating Animated and Remote Rollovers--In
Lesson 8, you learn to create rollover buttons, but in this lesson,
you create animated multi-state rollover buttons  so
that they move when you click on them. You learn how to do the following:
animate a rollover button in different rollover states; apply sound,
shadow style, and 3D cutout effects; create time-independent groups;
use the Timeline window as a selection tool; and set up conditions
for secondary, remote rollovers. The lesson takes about 60 minutes
to complete. There is a start and ending file on the CD. See the image
to the left for a flattened view of the finished lesson.
so
that they move when you click on them. You learn how to do the following:
animate a rollover button in different rollover states; apply sound,
shadow style, and 3D cutout effects; create time-independent groups;
use the Timeline window as a selection tool; and set up conditions
for secondary, remote rollovers. The lesson takes about 60 minutes
to complete. There is a start and ending file on the CD. See the image
to the left for a flattened view of the finished lesson.
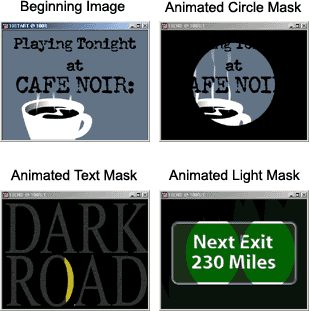
Lesson 10: Animating Masks--With
LiveMotion, you can use the shape of one object 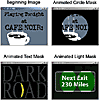 to
mask other objects. Only the part of the objects within the mask are
then visible. In this lesson, you learn to: create a simple animated
mask that changes size over time; create an animated type mask that
has an animated object moving under it;; and create an animated mask
that shows a different version of the same object under the mask.
It takes about 60 minutes to complete, and there are beginning and
ending files on the CD. See image to the right for a flattened view
of end product, and see our review of LiveMotion
for an animated Flash version.
to
mask other objects. Only the part of the objects within the mask are
then visible. In this lesson, you learn to: create a simple animated
mask that changes size over time; create an animated type mask that
has an animated object moving under it;; and create an animated mask
that shows a different version of the same object under the mask.
It takes about 60 minutes to complete, and there are beginning and
ending files on the CD. See image to the right for a flattened view
of end product, and see our review of LiveMotion
for an animated Flash version.
Lesson 11: Creating Basic Behaviors--In
this chapter you make your LiveMotion animations interactive by using
behaviors. You learn to: add behaviors to animation  timelines
and add behaviors to rollover states. You create a timer that indicates
the current time in a song. The timer will be in the format 0:00,
indicating minutes and seconds. To create the timer, you make three
time-independent, interacting objects: minutes, tens of seconds, and
seconds. It takes about 90 minutes to complete, and there is a start
and ending file on the CD. See image to the left for a fattened version,
and see our review of LiveMotion
for an animated Flash version.
timelines
and add behaviors to rollover states. You create a timer that indicates
the current time in a song. The timer will be in the format 0:00,
indicating minutes and seconds. To create the timer, you make three
time-independent, interacting objects: minutes, tens of seconds, and
seconds. It takes about 90 minutes to complete, and there is a start
and ending file on the CD. See image to the left for a fattened version,
and see our review of LiveMotion
for an animated Flash version.
Lesson 12: Animating Time-Independent Groups--With
LiveMotion, you can create many animations in a single composition
using time-independent groups. For example, for complex compositions,
you can create each animation in a separate file and then place  them
all into the final composition timeline. With Lesson 12, you learn
to assemble multiple animations into one composition; work with time-independent
objects and groups; create various animated effects using simple techniques;
create repeating animations using two different methods; convert Photoshop
and Illustrator layers into objects or time sequences; and create
a style and apply it to multiple objects. You create a composition
that contains five animated groups of objects (called Cube, Jumping
Text, Firedance, Noise, and Rain). It takes about 90 minutes to complete.
There are start, source, and end files on the CD. See image to the
right for a flattened view of one segment of the project, and see
our review of LiveMotion
for a Flash version of the section.
them
all into the final composition timeline. With Lesson 12, you learn
to assemble multiple animations into one composition; work with time-independent
objects and groups; create various animated effects using simple techniques;
create repeating animations using two different methods; convert Photoshop
and Illustrator layers into objects or time sequences; and create
a style and apply it to multiple objects. You create a composition
that contains five animated groups of objects (called Cube, Jumping
Text, Firedance, Noise, and Rain). It takes about 90 minutes to complete.
There are start, source, and end files on the CD. See image to the
right for a flattened view of one segment of the project, and see
our review of LiveMotion
for a Flash version of the section.
Review C--In this last review
section, you use the techniques you learn in Lessons 8 through 12
to make a wire figure move in and out of the composition, and another
figure move along a series of animated rectangles. You do all this
by creating time-independent groups. You then create rollovers and
add behaviors to trigger the animations you create. The files you
need are on the CD.
Lesson 13: Adding Sounds to Your Composition--In
the same way that you add image files, you can add sound files to
a composition timeline. In this lesson, you learn to; add sounds to
five time-independent groups; create a looping effect that makes a
sound seem to play continuously; and use the Solo Event Sound property.
You place sounds for the five animated groups of objects (called Cube,
Jumping Text, Firedance, Noise, and Rain), and it takes about 30 minutes
to complete. The files you need are on the CD.
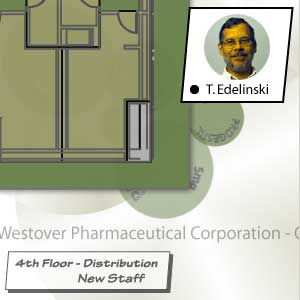
Lesson 14: Creating Advanced Behaviors--By
adding behaviors to animated objects, you can make compositions move
in response to the mouse pointer. For example, objects can move up
and down and side to side following the mouse. Behaviors can even
make other objects appear or go to another point in the animation.
In this lesson, you learn to: create  behaviors
that are triggered by keyframes; create behaviors that are triggered
by rollover states; and make behaviors that cause objects to follow
and respond to the mouse pointer. You create a composition of a floor
plan. You move the mouse pointer over the floor plan to move your
view of the plan. When an office in the floor plan is near the center
of the composition, you can move the mouse pointer over it to make
the floor plan stop. When the office displays the silhouette of an
employee, you can click the office to view a photo of the employee
who works there. It takes about 60 minutes to complete. Start and
ending files are on the CD. See image to the left for a flattened
view.
behaviors
that are triggered by keyframes; create behaviors that are triggered
by rollover states; and make behaviors that cause objects to follow
and respond to the mouse pointer. You create a composition of a floor
plan. You move the mouse pointer over the floor plan to move your
view of the plan. When an office in the floor plan is near the center
of the composition, you can move the mouse pointer over it to make
the floor plan stop. When the office displays the silhouette of an
employee, you can click the office to view a photo of the employee
who works there. It takes about 60 minutes to complete. Start and
ending files are on the CD. See image to the left for a flattened
view.
Lesson 15: Combining Animations With QuickTime
Movies in Adobe GoLive 5.0--You can set up your SWF animations
in Adobe LiveMotion to include QuickTime movies. Then you can use
Adobe GoLive 5.0 to easily integrate the QuickTime movies with the
SWF animations into a final QuickTime movie for your Web page. In
this lesson, you learn to: set up a timeline for three QuickTime movies
in LiveMotion; set up a movie controller to display each QuickTime
movie separately; and integrate the final SWF composition with the
QuickTime movies using Adobe GoLive 5.0. It takes about 60 minutes
to complete. The files you need to work with in this lesson are on
the CD.
Lesson 16: Exporting--In LiveMotion,
when preparing to export, you can choose  settings
to reduce file sizes, and increase resolution. In this lesson, you
learn to: choose which export format best suits your composition;
use the export settings in the Composition
Settings dialog box; use the Export palette; adjust object settings
for optimal size and quality; and export to different formats. It
takes about 45 minutes to complete and the files you need are on the
CD. See image to the right
for an exported Flash version of a project saved with the AutoLayout
option.
settings
to reduce file sizes, and increase resolution. In this lesson, you
learn to: choose which export format best suits your composition;
use the export settings in the Composition
Settings dialog box; use the Export palette; adjust object settings
for optimal size and quality; and export to different formats. It
takes about 45 minutes to complete and the files you need are on the
CD. See image to the right
for an exported Flash version of a project saved with the AutoLayout
option.

 Title:
Adobe LiveMotion Classroom in a Book
Title:
Adobe LiveMotion Classroom in a Book