The installation is quick and easy. Always peruse the CD before you install, as many programs, especially Adobe,
include free goodies. On the ImageStyler you will find Adobe Acrobat Reader 3.0, Adobe Type Manager Light 4.0,
with fonts, stock art, tutorials, sample template Web pages, and tryout versions of other Adobe products. You
don't have to install everything at once, but can use items from the CD when needed.

The interface is similar to other Adobe products, includes Adobe-standard
tools, menus, floating palettes, and keyboard shortcuts. It uses Photoshop
file format and acquisition p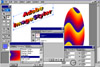 lug-ins
to import EPS, GIF, JPEG, PSD, DIB, BMP, and PICT files or to bring
in images from compatible scanners and digital cameras. Across the
top of the work area is a Menu Bar with the following dropdown menus:
File, Edit, View, Object, Layer, Window, and Help. In the Tool Box,
you have a variety of tools: Selection, Subgroup-selection, Drag Selection,
Layer-offset; Rectangle, Rounded Rectangle, Ellipse, Polygon, Text,
Crop, Rotate, Skew, Paint Bucket; Eye Dropper, Hand, and Zoom. I especially
liked the Layer-offset Tool which allows you to select a layer or
effect, such as a drop shadow, and quickly drag or offset it.
lug-ins
to import EPS, GIF, JPEG, PSD, DIB, BMP, and PICT files or to bring
in images from compatible scanners and digital cameras. Across the
top of the work area is a Menu Bar with the following dropdown menus:
File, Edit, View, Object, Layer, Window, and Help. In the Tool Box,
you have a variety of tools: Selection, Subgroup-selection, Drag Selection,
Layer-offset; Rectangle, Rounded Rectangle, Ellipse, Polygon, Text,
Crop, Rotate, Skew, Paint Bucket; Eye Dropper, Hand, and Zoom. I especially
liked the Layer-offset Tool which allows you to select a layer or
effect, such as a drop shadow, and quickly drag or offset it.

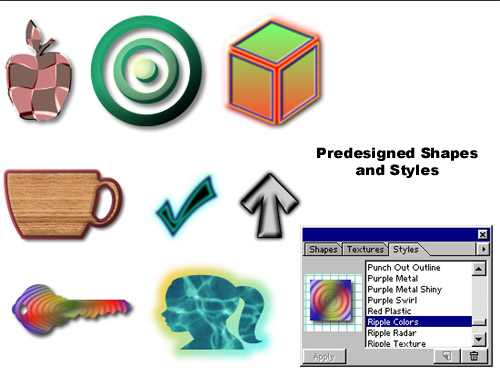
This guide gets you up and running quickly. It's about 136 pages
with nine chapters. Chapter 1 introduces you to key fe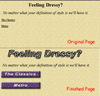 atures of Im
 ageStyler and takes about an hour to complete. Your
finished product will be a Web page. You place objects; add a 3D effect;
style and arrange objects; add text; work with layers; create an image
map; add shapes; add a rollover action; add a background; and then
save and export the file. Sound difficult? Well, it isn't! And your
final image should look like the image to the left.You can see the
rollover effect (a color change from mercury to red) on the right
arrow spiral on the bottom of the graphic.
ageStyler and takes about an hour to complete. Your
finished product will be a Web page. You place objects; add a 3D effect;
style and arrange objects; add text; work with layers; create an image
map; add shapes; add a rollover action; add a background; and then
save and export the file. Sound difficult? Well, it isn't! And your
final image should look like the image to the left.You can see the
rollover effect (a color change from mercury to red) on the right
arrow spiral on the bottom of the graphic.
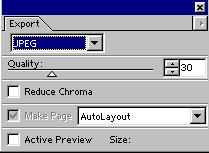
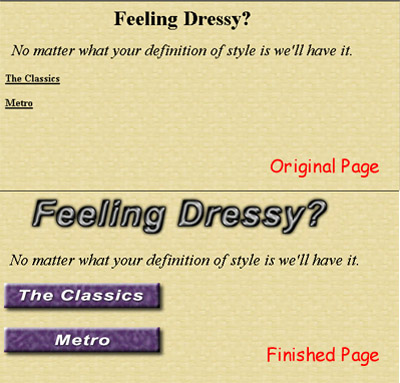
You also will make an HTML file more interesting by replacing its
text headings with images. After I did the tutorial, I made the gold
subheadings for this review . I started
with just the plain Heading 4 type in my review; created the gold
text style in ImageStyler; used the Web palette in ImageStyler to
choose the heading I wanted to replace with my style; and used the
Batch Replace HTML command under the File menu in ImageStyler, to
replace the plain Heading 4s in the review with the new gold heading.
. I started
with just the plain Heading 4 type in my review; created the gold
text style in ImageStyler; used the Web palette in ImageStyler to
choose the heading I wanted to replace with my style; and used the
Batch Replace HTML command under the File menu in ImageStyler, to
replace the plain Heading 4s in the review with the new gold heading.

For users new to the field of Web design and design software, I will briefly explain how ImageStyler works,
which will in turn illustrate why the program is powerful and allows you to create complex objects.
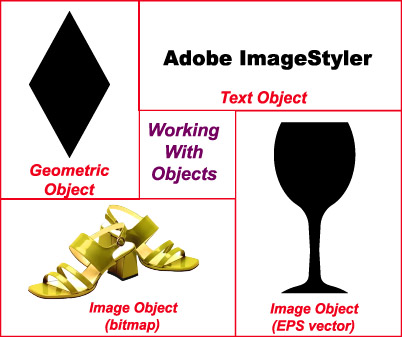
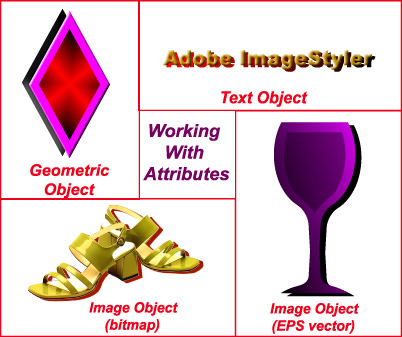
Objects--Objects are the basic
elements you create and work with in ImageStyler compositions. They
are the pieces with which y ou can design and build
the graphic elements for a Web page. There are three kinds of objects:
(1) Geometric objects are objects you create with the drawing tools.
Circles and rectangles are examples of geometric objects; (2) Text
objects are text you create using the type tool or import from other
documents; and (3) Image objects are bitmap images and Encapsulated
PostScript (EPS) vector images that you import into the program.
ou can design and build
the graphic elements for a Web page. There are three kinds of objects:
(1) Geometric objects are objects you create with the drawing tools.
Circles and rectangles are examples of geometric objects; (2) Text
objects are text you create using the type tool or import from other
documents; and (3) Image objects are bitmap images and Encapsulated
PostScript (EPS) vector images that you import into the program.
Shapes--All objects have a shape. Geometric objects have a regular shape,
and are either rectangles, polygons, or ellipses. Text objects are the shape of the individual characters in the
text. Bitmap images generally have a rectangular shape. EPS vector images are the shape in which they were created
by the application.
Layers--An object is made up
of one to five layers, with each layer the shape of that object.
Unlike some other graphics programs, such as Adobe Photoshop and
Adobe Illustrator, layers in ImageStyle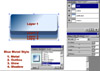 r apply to individual objects, not the entire composition.
You can add, delete, reorder, and offset layers at anytime. Object
layers was probably the most difficult feature of the program for
me. I am so familiar with Photoshop and working with its layers
that I had to stop and re-think what I was doing in ImageStyler.
Once you adjust, though, you realize how easy it is to work with
object layers.
r apply to individual objects, not the entire composition.
You can add, delete, reorder, and offset layers at anytime. Object
layers was probably the most difficult feature of the program for
me. I am so familiar with Photoshop and working with its layers
that I had to stop and re-think what I was doing in ImageStyler.
Once you adjust, though, you realize how easy it is to work with
object layers.
Layer Attributes--Each layer
in an object can be filled with a different set of attributes, including
color, opacity, gradients, and 3-D and distortion effects. By applying
different attributes to each la yer, you can create a variety of effects and create
complex-looking objects. For example to create a button out of a
simple geometric object, you might give it three layers: emboss
and fill the top layer with a texture; make the next layer wider
and fill it with a color to give the effect of an outline around
the button; and then offset a third layer and fill it with semitransparent
gray to simulate a shadow for the button.
yer, you can create a variety of effects and create
complex-looking objects. For example to create a button out of a
simple geometric object, you might give it three layers: emboss
and fill the top layer with a texture; make the next layer wider
and fill it with a color to give the effect of an outline around
the button; and then offset a third layer and fill it with semitransparent
gray to simulate a shadow for the button.
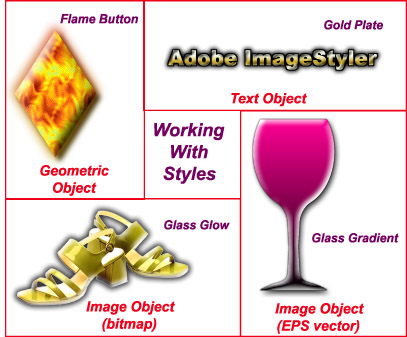
Styles--You can save the number
of layers along with the attributes of each layer as a set, called
a style. You can then apply the style to any object to easily change
the look of the object without changing its shape. For example,
you can apply a style to a text object to give the object several layers, each with a different set of layer attributes.
The text object would then have all the attributes of that style.
An excellent way for a beginner to understand what attributes make
up a style and the options used in the various palettes is to apply
a style to an object, open the various palettes, and turn on and
off the various object layers to see the effects on the object.
the object several layers, each with a different set of layer attributes.
The text object would then have all the attributes of that style.
An excellent way for a beginner to understand what attributes make
up a style and the options used in the various palettes is to apply
a style to an object, open the various palettes, and turn on and
off the various object layers to see the effects on the object.
Editing--You can apply nearly any modifications to any objects in any order.
You can even apply them to multiple objects at the same time. You can transform objects by skewing, rotating, and
resizing them. You can also change individual layer attributes or entire styles at any time. Modifications are
nondestructive. You can clear all modifications applied to an object. When working with images in a composition,
ImageStyler keeps a copy of the original image in the file, along with any changes applied to it. As a result,
styles and even transformations to bitmap images are nondestructive. You can shrink an imported image, skew it,
apply a style to it, and still return the image to the way it looked when you first imported it--even if you've
saved and closed the composition multiple times. This feature takes the fear out of learning for novices. They
can experiment all they want and still retain the original object.

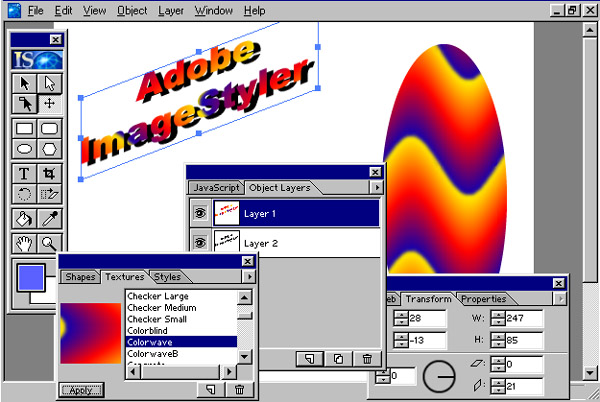
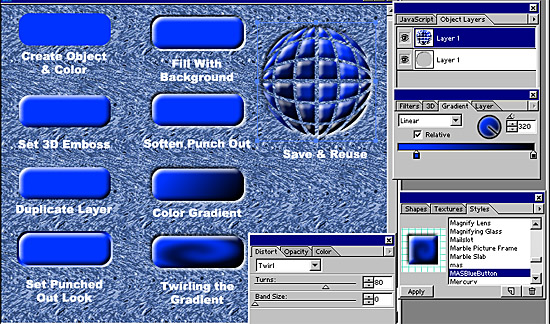
By working with objects and layers in ImageStyler, you can create
sophisticated effects 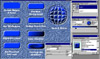 that
are applied to objects and then can be saved as styles and reused.You
have about seventeen different palettes to work with in the program,
each with various options, and they are all fairly easy to use and
intuitive. I used the Layers and Attributes tutorial in the Product
Guide folder on the CD to create the image to the left. I will briefly
go through the steps and discuss the tools and/or palettes used because
I think it is a good example of how ImageStyler works.
that
are applied to objects and then can be saved as styles and reused.You
have about seventeen different palettes to work with in the program,
each with various options, and they are all fairly easy to use and
intuitive. I used the Layers and Attributes tutorial in the Product
Guide folder on the CD to create the image to the left. I will briefly
go through the steps and discuss the tools and/or palettes used because
I think it is a good example of how ImageStyler works.
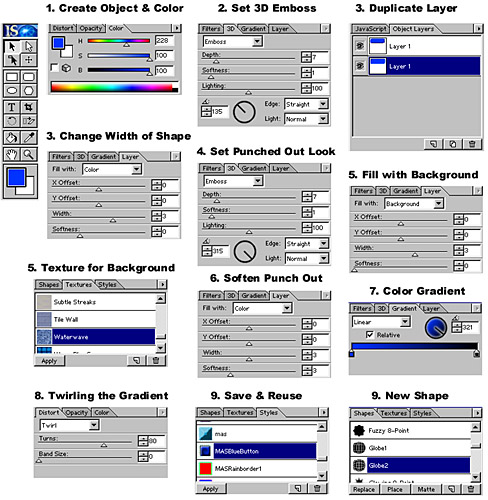
Step 1--An object is created using the creation tools or by importing an
image file. I used the Rounded Rectangle tool to create the object and then used the Color tool palette to change
the color to blue. It has a Web safe color cube checkbox that can be checked if you want to filter out all but
the Web safe colors.
Step 2-- I then used the 3D
tool palette to specify an emboss effect by changing the depth to
7. 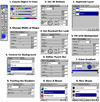
Step 3--I needed a second layer and created this by clicking on the duplicate
button on the bottom of the Object Layers palette. I then changed the width attribute to 3 pixels wider for the
object in the second layer.
Step 4--For the punched out look, I returned to the 3D palette and reversed
the light source using the angle control at the bottom of the palette to 315.
Step 5--To create an even more punched out look, I filled the background
with a texture by dragging a texture from the Textures palette to the background of the composition window. I used
the Layers palette to select a fill mode of Background. This will take whatever is below the object and use it
to fill the current layer.
Step 6--To soften the edge of the second layer, I adjusted the softness
in the Layers palette.
Step 7-- A color gradient was set on Layer 1. There are several different
gradient types to choose from. I selected a Linear gradient and adjusted the angle control to 321.
Step 8--I added a distortion filter for further emphasis. Again, there are
a variety of different types to choose from. I selected the Twirl filter.
Step 9--For the final step, I saved the design to the Style palette and
then applied it to another shape.

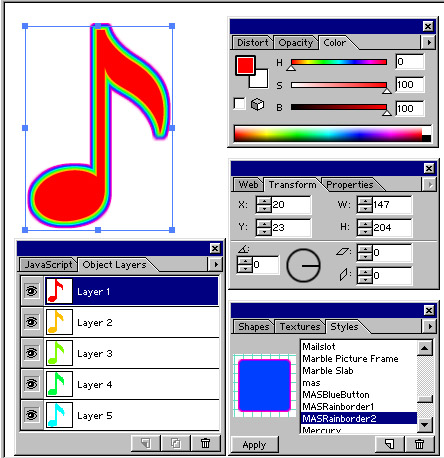
You can create cool border effects on any shape in ImageStyler. The program allows you to assign up to five
object layers within a particular style. But to create the image to the right with the colorful rainbow effect,
it requires eight different object layers. By layering identical objects with slightly different settings applied
to them, you can create effects that use multiple object layers. I used a tutorial from the Adobe Web site for
this image.
Step 1--I started by drawing
a rectangular shape. It's not the  final
shape as once the effect is created, you can apply it to any object.
final
shape as once the effect is created, you can apply it to any object.
Step 2--To begin the rainbow effect I started with red and moved through
the spectrum. You work with the HSB View in the Color palette (hue, saturation, brightness) so you can shift the
hue without changing brightness or saturation.
Step 3--I duplicated layers until I had five, and with each one, I increased
the width and hue values. Since ImageStyler only allows five object layers, I saved the style in the Style palette,
MASRainborder1.
Step 4--I started again with the topmost layer and changed the width and
hue settings on the first three layers. The last two layers were then deleted. Then I created a new style with
a different name, MASRainborder2.
Step 5--After I created the two styles, I needed to put them into action.
I used the note shape from the Shapes palette and stacked the two copies of the object on top of each other.
Step 6--Then I applied the MASRainborder1 style to the copy and applied
the MASRainborder2 style to the original object.
Step 7--When ImageStyler duplicates an object, it offsets the copy by 20
pixels to the right and 20 pixels down. Since I wanted the copy to be in the same position as the original, I needed
to use the Transform palette to set the position of the object on the page. To set the duplicated object to the
correct location, I subtracted 20 from both the X and Y coordinates and I had my rainbow image.
What's fun about creating a style is that you can reuse it at anytime
and appl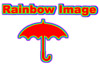 y
it to other objects, texts, or images. I took the same two styles
and applied them to text and the umbrella shape from the Shapes palette
to create the image to the right. You can even edit it and create
a new style from it.
y
it to other objects, texts, or images. I took the same two styles
and applied them to text and the umbrella shape from the Shapes palette
to create the image to the right. You can even edit it and create
a new style from it.

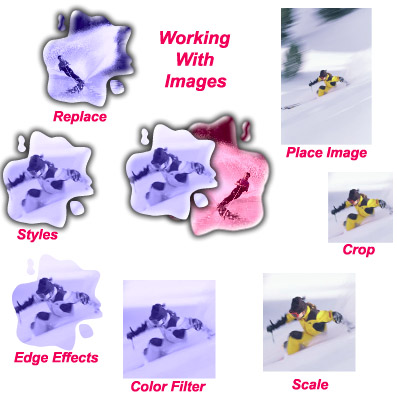
With ImageStyler you have a variety of tools for working with images. The image on the right illustrates some
of the tools you can you. For this illustration I used the sample "Working with Images" tutorial on the
CD in the Product Guide Folder.
Step 1--Images are not "opened" but are instead "placed"
(imported) into an ImageStyler composition. This is done through the Place menu item or by dragging and dropping
an image file on a composition. I placed the snow skier image.
Step 2--A fundamental imaging
operation is cropping, which I did with the image. A unique feature
of cropping in ImageStyler is that it has the nondestructive feature.
You can save the document and open it two weeks later and uncrop
the image to get back the portion that is 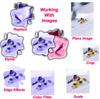 now
trimmed.
now
trimmed.
Step 3--After cropping, another technique I used on the image was scaling.
The regular selection tool acts as the scale tool when you select an edit node. Again, this is a non-destructive
edit. You can get the original size back any time.
Step 4--There a a series of color filters for adjusting images in the program.
These can be used on any object but are most useful for images or objects with textures. I wanted a Cobalt effect
so I set the Tint value to the maximum (255). This replaces all of the color information with the currently selected
color in the Color palette. I selected a dark blue.
Step 5--Edge effects always enhance an image. This can be done by applying
some adjustment that replaces the alpha information (matte) of the image with some shape. For the skier image I
wanted to replace the alpha information with a shape from the Shapes palette. I selected the shape called "Puddle
1" and hit the Matte button. This created what is called an "Active Matte" for the image. The alpha
information has been replaced as can be seen with the image itself. You can still scale, rotate, etc. the image
at this point and the matte will be adjusted to match.
Step 6--At this point, I applied the "Glass glow" style from the
Styles palette to the image. I now had an image object with a fairly elaborate look. The order that I used to create
this object was entirely arbitrary. I could go back and change any attribute and all of the other attributes would
be maintained.
Step 7--The advantage of the ImageStyler editing model is the concept of
replacing an image. If I had a series of images that I wanted to do the same thing to, instead of running through
all the steps of cropping, scaling, tinting, etc., I could use the current object as a template. I did this by
using the Duplicate menu item to make a copy. I then selected a new image, the water skier, picked the Replace
menu item and selected the snow skier image file. The image was replaced but all the scaling, cropping, etc. had
been retained and reapplied.

Rollovers are fun to create and help you create a professional image
on a Web page. You can create a button that changes shape when a mouse
cursor moves over it; set a bitmap image to change to another image
when clicked and more. Because ImageStyler associates JavaScript code
with an object, you can move the object without having to reapp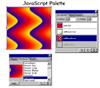 ly the code. To attach a JavaScript action to a button,
you select an object and then attach a state to the object. You then
alter the object to represent different states. The JavaScript palette
displays a row of buttons to create a new state, duplicate a state,
or delete a state. You can define actions or appearance for: MouseOver--displays
when the pointer is directly over the object; MouseDown--displays
when the pointer clicks the object; and MouseOut--displays when the
pointer is moved away from the object
ly the code. To attach a JavaScript action to a button,
you select an object and then attach a state to the object. You then
alter the object to represent different states. The JavaScript palette
displays a row of buttons to create a new state, duplicate a state,
or delete a state. You can define actions or appearance for: MouseOver--displays
when the pointer is directly over the object; MouseDown--displays
when the pointer clicks the object; and MouseOut--displays when the
pointer is moved away from the object .
Unique appearances for a state can be created by doing any of the
following: use the X Offset and Y Offset text boxes or arrows at the
top of the JavaScript palette to move the object horizontally or vertically
from the NoAction state; apply any ImageStyler style, texture, or
shape to the selected object, or apply a color or gradient; drag the
object by its upper right corner or anchor point to rotate it; and
use other palettes, tools, and commands to change the object's appearance,
position, and size. The image to the right shows a rollover with a
Blue Metal style change. The image to the left shows the JavaScript
palette with Gold Metal Embed style change for the MouseOver state
and a Colorwave texture change for the MouseDown state.
.
Unique appearances for a state can be created by doing any of the
following: use the X Offset and Y Offset text boxes or arrows at the
top of the JavaScript palette to move the object horizontally or vertically
from the NoAction state; apply any ImageStyler style, texture, or
shape to the selected object, or apply a color or gradient; drag the
object by its upper right corner or anchor point to rotate it; and
use other palettes, tools, and commands to change the object's appearance,
position, and size. The image to the right shows a rollover with a
Blue Metal style change. The image to the left shows the JavaScript
palette with Gold Metal Embed style change for the MouseOver state
and a Colorwave texture change for the MouseDown state.

ImageStyler allows you to create graphical mattes by applying shapes to selected objects to mask them. Anything
outside the shape disappears, leaving only what's enclosed by the shape to show through. The Amazon page was created
with the following steps.
Step 1--I typed the text "Discover the Amazon" to serve as the
shape for the active matte.
Step 2--I opened the Shapes palette, chose the Selection tool and dragged
the text to the Shapes palette, and renamed the selection. I then deleted the text as it is saved in the Shapes
palette as a shape.
Step 3--I imported an image
for a background; opened both the Properties palette and the Shapes
palette; clicked the text  swatch that was created
and dragged it to the Active Matte section in the Properties palette;
and viola, the text shape became an active matte over the image.
An active matte is similar to taking a sheet of cardboard and cutting
an image out of it, then putting what was left of the cardboard
over another image. The cardboard serves as the matte, and the cutout
stencil allows the image beneath to show through.
swatch that was created
and dragged it to the Active Matte section in the Properties palette;
and viola, the text shape became an active matte over the image.
An active matte is similar to taking a sheet of cardboard and cutting
an image out of it, then putting what was left of the cardboard
over another image. The cardboard serves as the matte, and the cutout
stencil allows the image beneath to show through.
Step 4--I then fine-tuned the effect by adding a 3D effect to the matte
and added a JavaScript rollover button on the bottom.
Step 5--I exported the file using the Make Page option. ImageStyler exported
the image files and created an HTML page with the JavaScript code. If you click on the thumbnail and view the
actual Web page, you can see the rollover button in action.
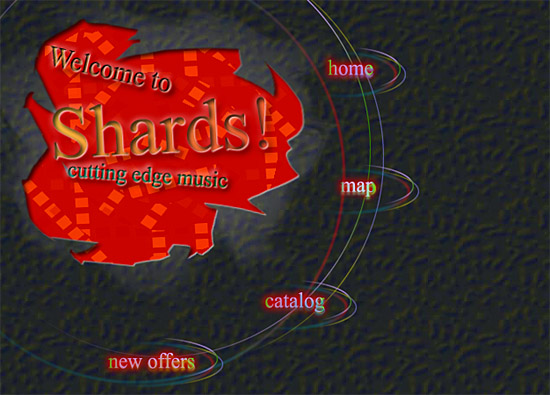 geStyler
contains 100 pre-designed styles, dozens of shapes (ranging from umbrellas
and trees to typographical dingbats), and Web page templates that can
be used to q
geStyler
contains 100 pre-designed styles, dozens of shapes (ranging from umbrellas
and trees to typographical dingbats), and Web page templates that can
be used to q uickly create
sophisticated and professional Web pages, with JavaScript rollovers, by
even the most design-impaired individual with no HTML or JavaScript code
background. The image to the left is a template from ImageStyler. The
image to the right was created using the ImageStyler template and customizing
it.
uickly create
sophisticated and professional Web pages, with JavaScript rollovers, by
even the most design-impaired individual with no HTML or JavaScript code
background. The image to the left is a template from ImageStyler. The
image to the right was created using the ImageStyler template and customizing
it.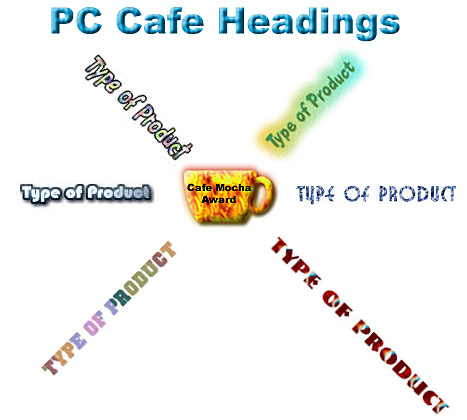 All of the tutorials used in
this review were very basic, easy and quick, accessible from the CD or
the Adobe Web site, and were designed for novices to use to create professional
images and impress their friends! If you just attempt the few tutorials
that were done in this review, you will acquaint yourself and have used
most of the tools and palettes in ImageStyler. I must admit that I was
impressed with the program. When I first received it, I immediately used
it for headings. After I played with the tutorials and started using the
program for layouts for this review, I was amazed at how much I could
do in the program without having to bring the images into Photoshop for
completion, as I do in many of the reviews. A few screen shots were brought
into Photoshop for minor tweaking, but about 99.9% of the review was created
in ImageStyler and put right into our Web page editor. ImageStyler was
great for the following tasks for the layouts: alignment of text and objects
was set with the Object Align and Distribute commands; the Rotate tool
and the Transform palette were used to transform objects and text; the
Rectangle tool and the Properties palette with the Outline option was
used to make lines or boxes for separation of objects for the screen shots
under the Basic Concepts subheading; the gold subheadings were exported
with the Batch Replace HTML command; the red subheadings were exported
as JPEG images with the Export Selection command; and the text matte image
was exported, as a Web page with all its links and JavaScript rollover,
using the AutoLayout option in the Web palette. And, this is only the
first version. Good job, Adobe!!
All of the tutorials used in
this review were very basic, easy and quick, accessible from the CD or
the Adobe Web site, and were designed for novices to use to create professional
images and impress their friends! If you just attempt the few tutorials
that were done in this review, you will acquaint yourself and have used
most of the tools and palettes in ImageStyler. I must admit that I was
impressed with the program. When I first received it, I immediately used
it for headings. After I played with the tutorials and started using the
program for layouts for this review, I was amazed at how much I could
do in the program without having to bring the images into Photoshop for
completion, as I do in many of the reviews. A few screen shots were brought
into Photoshop for minor tweaking, but about 99.9% of the review was created
in ImageStyler and put right into our Web page editor. ImageStyler was
great for the following tasks for the layouts: alignment of text and objects
was set with the Object Align and Distribute commands; the Rotate tool
and the Transform palette were used to transform objects and text; the
Rectangle tool and the Properties palette with the Outline option was
used to make lines or boxes for separation of objects for the screen shots
under the Basic Concepts subheading; the gold subheadings were exported
with the Batch Replace HTML command; the red subheadings were exported
as JPEG images with the Export Selection command; and the text matte image
was exported, as a Web page with all its links and JavaScript rollover,
using the AutoLayout option in the Web palette. And, this is only the
first version. Good job, Adobe!!