|
Classic Camera Corner
Simple Stereo Photography
by Graham Law, President, Seawood
Photo
May
2008
I started shooting stereo over
twenty years ago because it had no monetary value
whatsoever.
I was shooting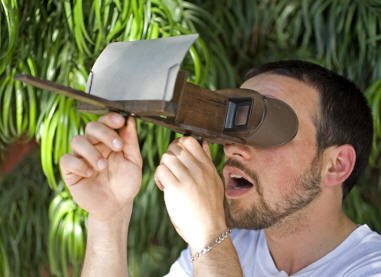 commercial and stock photos at the time, and had hit a
point where photography wasn’t as much fun as it used to
be. Before every shot I would wonder if it was a
marketable image. I stopped shooting for myself; it was
all business.
commercial and stock photos at the time, and had hit a
point where photography wasn’t as much fun as it used to
be. Before every shot I would wonder if it was a
marketable image. I stopped shooting for myself; it was
all business.
Then someone gave
me an old 3.5 Stereo Realist camera and a battery
operated viewer.
We’ve all looked at
Viewmaster reels as kids; this was similar, but the
image quality was astounding! It was like actually being
there as the photo was taken and could reach out and
touch the subject.
I soon started
shooting friends, pets, and family. I was hooked. I
couldn’t sell the images…and it was great!
Family photos are
definitely the most fun. If you have kids, you know how
quickly they change. Being able to see three dimensional
images of them that show how they used to look is like
having your own personal time machine!
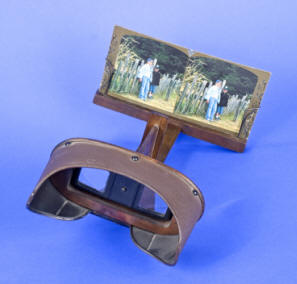
Realist cameras use
standard 35mm slide film, are easily mounted in
cardboard or plastic mounts, and are then viewed with a
battery operated hand held viewer.
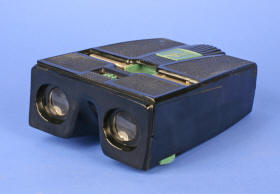 
Realist Viewer and Camera
As there are lots of websites
devoted to the theory and principles of stereo
photography, I decided not to go there. Instead, I
thought it would be fun to have a simple descriptive
page that shows how to get started immediately with
equipment you already own (assuming you have a camera
and a printer), and showcase some really interesting 3D
cameras and accessories.
In a nutshell, stereo
photography is created by taking two photographs of the
same subject. The second frame is taken approximately
2-1/2” to the left or right of the first image, (about
the distance that your eyes are spaced).
There are several great ways to
get stereo pairs. Perhaps the simplest is to use a Bogen
Slide Bar (at right, available at Seawood Photo of
course!).
This mounts on any tripod and
consists of a quick release platform that attaches to
the camera, and a base that the platform dovetails into
and can be slid to the left and right.
Take a photo, slide the camera
to the opposite side of the bar, and take another. As
long as your subject hasn’t moved, you will get a
useable 3d image.
Stereo pairs can also be done
hand held; simply place all your weight on your left
foot, take a photo, then shift your weight to your right
and take another.
Stereo cameras have two lenses
and take both photos at the same instant, making this
fast and easy. As both images are taken at the same
instant subject movement is no longer a problem.
When the completed photos are
viewed in pairs with a stereo viewer your brain
automatically fuses the two images into one that has the
illusion of depth.
STEREO VIEWERS
Viewing transparencies in an
illuminated or capture-the light viewer is a good way to
present your images, and they are easy to do. There are
several vendors online that sell stereo mounts and
viewers to fit your camera format/film size, such as
www.3dstereo.com.
 All
you need to do is shoot transparency film, get it E6
processed and be sure to tell your lab that you want
them back unmounted. You then cut the film between the
frame lines and match up the stereo pairs. With
cardboard mounts you simply slide the film “chits” into
the slots in the back and you are done! Plastic mounts
have a front and a back that snap together with the chit
placed between. All
you need to do is shoot transparency film, get it E6
processed and be sure to tell your lab that you want
them back unmounted. You then cut the film between the
frame lines and match up the stereo pairs. With
cardboard mounts you simply slide the film “chits” into
the slots in the back and you are done! Plastic mounts
have a front and a back that snap together with the chit
placed between.
It is important to keep the
images in the correct left-to right orientation. If
mounted incorrectly, you get a “reverse-stereo” effect,
which looks quite odd. If it doesn’t look right just
remount them.
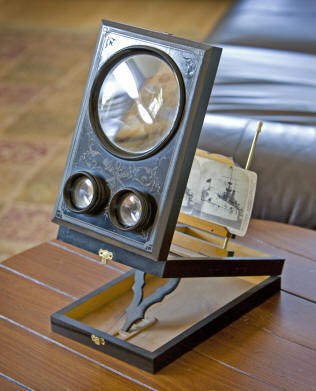
An alternative to transparencies
is to make prints and use a stereopticon (above). I
actually find these more fun than the slides. Plus your
friends look like a giant mosquito when they use one!
There are lots of old stereopticons (also called Holmes
viewers) around. I’ve found useable ones in local
antique shops for under $60.00. New ones are available
online for under $100.
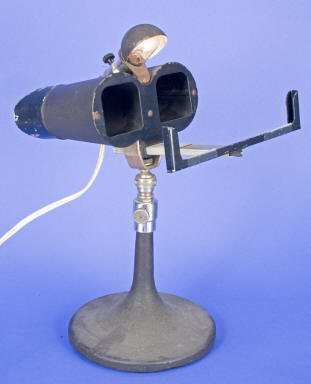
There are also more
sophisticated viewers such as the table top illuminated
viewer below.
.
Many ornate stereo viewers were
produced in Europe around the turn of the century, such
as this one:
PRINTING
The prints are easy to make. I
use an Epson V750 Pro scanner to scan my transparencies.
I then make a 3-1/4 x 3-1/4” print of each image and
print the pair side by side on a 3-1/2 x 7” card. (Since
this is an almost square image you will have to crop the
image if you are using a rectangular format camera such
as 35mm or most modern DSLR’s . As 6x6 film cameras on
the used market are dirt-cheap these days, it might be
worth investing in one if you want to make stereo
cards).
Here’s a link to a Photoshop
template I’ve made that will allow you to print two
stereo cards on one letter-sized sheet of photo paper:
Stereo Card Template
(TIF file, 26mb). The template is a layered
TIFF file that you can open in Photoshop, and drop your
photos right in as a new Photoshop layer. Simply paste
your photos in, arrange them so they are in place below
the template layer, and print. Note that the file is
300dpi.
I like to use a drymount press
to mount my images on card stock. It gives them the same
weight and feel as vintage stereo cards. This is not
necessary if you use a heavy weight photo paper. And
I’ve found that some inkjet papers work better than
others. Using a stereopticon is like looking at a print
with a magnifying glass; if the paper doesn’t absorb the
ink well you will see a dot matrix on the print. Arches
Infinity Smooth Finish is my current favorite as it
looks brilliant and pixel-less!
COOL 3D
There are many interesting
stereo options available on the used market. Here are a
few:
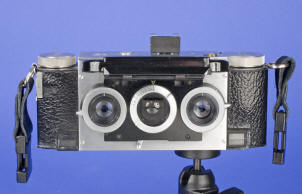
The Stereo Realist and the Kodak
Stereo 35mm cameras are inexpensive and work great. You
can upgrade to a Realist Custom with matched rare-earth
lenses, ostrich skin covering, and a brighter 2.8
aperture setting. A lens manufacturer named Steinheil
produced a wide-angle lens attachment for the Realist
and Kodak cameras in the late 50’s (below).
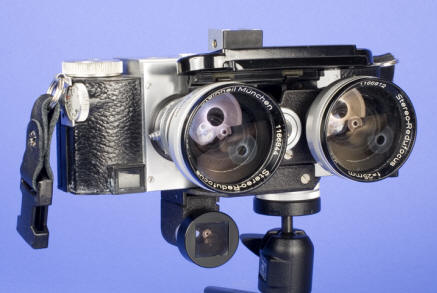
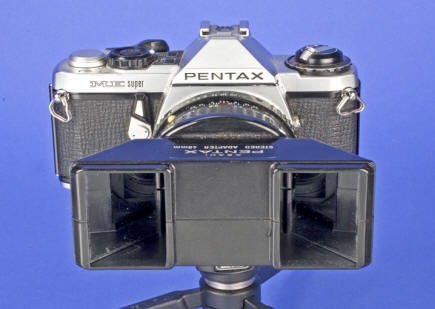
Pentax made a device called a
beamsplitter (below) that mounts on the front of a 50mm
lens. By using mirrors this takes two images side by
side on one 35mm frame.
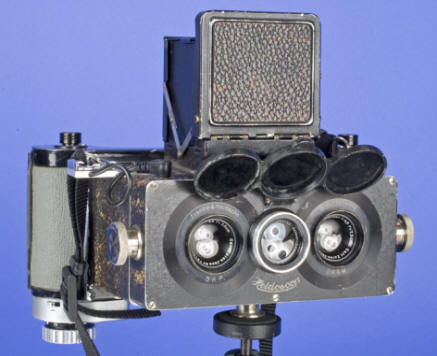
There have also been many
excellent 6x6 stereo cameras. The first cameras
Rolleiflex made were stereo; the Rolleidoscop and
Heidoscop. Here is a Heidoscop that someone modified to
use a Mamiya 120mm rollfilm magazine:
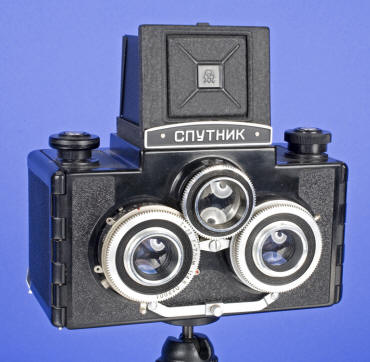
Russian cameras are plentiful
today; this Sputnik 6x6 stereo camera was purchased
online for under $150.00 and produces admirable results:
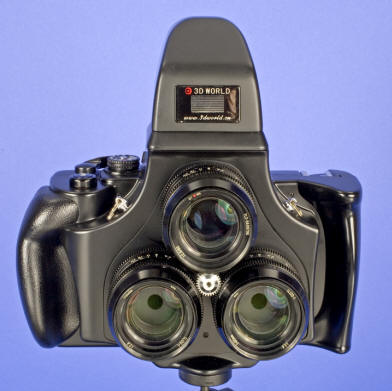
Incredibly, a brand new 120mm
6x6 format camera called 3Dworld is now being produced
in China. It sells for around $1700 complete with a
mounting jig and a very nice transparency viewer. It has
a built in light meter and removable prism finder (it
takes Hasselblad finders as well: I’m using a waist
level to save weight). I have only just begun testing
one and the initial results are better than anything
I’ve seen!
So go out there and get yourself
a stereo camera and add a little “depth” to your
photography!
BACK TO CLASSIC CAMERA CORNER
INDEX > |

