by C. Donald Harris Jr.
508 Misty Lane
Friendswood, TX 77546
I assume that by now most people who own both an Atari 400 or 800 computer and the Star Raiders game cartridge have either reached some level of proficiency or given up the challenge entirely and gone on to other interests. This article is directed toward those of you who have mastered the easier levels of the game, who thoroughly understand Atari's Star Raiders Users Manual, and are ready to attempt more hazardous adventures.
From my viewpoint, the four levels of difficulty should be considered in two groups:
I look at the Warrior level as basic training for the Commander level and suggest that your advanced training begin with that approach. Don't expect much in the way of rank at the Warrior level—the game-completion bonus is too low. A week or so of practice at the Warrior level will sharpen your skills considerably and, with the tips provided in this article, you should be prepared for the mastery of the Commander level.
You should first reach a fair amount of proficiency at the Pilot level. For example, you should be able to fly "on instruments." Without stopping to think, you should know at once where the Enemy, the Zylon, is from the azimuth, elevation, and range instruments on the display and which way to move the joystick to maneuver your craft. You should also know how to conserve energy during hyperwarp and when using the twin ion engines.
To properly prepare to wipe out your enemy, your battle plan should be designed around three priorities: survival, defense of starbases, and energy conservation. The main objective of course is survival (no easy task at the Commander level).
To begin the attack, switch to the Galactic Chart and press "P" (the Pause command). Now, it's study time: note the locations of your starbases in relation to the enemy's ships. This should help you plan your hyperwarp jumps from sector to sector more efficiently. The early-game strategy for defending starbases will include determining the starbase under attack and eliminating the fastest-moving enemy squadrons first. (Never go after a four-ship enemy squadron first, because you will find a starbase surrounded before you know it.)
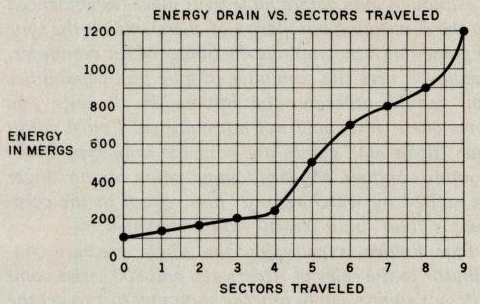
You won't be able to figure out which starbase is first on the Zylon's hit list right away. It may take 150 to 200 centons (time units) of tracking enemy squadron movements to decide. In this interval, you should have blitzed your second or third two-ship squadron. Pick a nearby two- or three-ship fleet (they are faster!) and attack it. A caution: don't stray too far from the galactic center until you're certain which starbase to defend. You don't want to waste energy crossing the entire galaxy to begin your starbase defense. Don't forget about passing centons. Check the galactic chart during lulls in the fighting and note enemy-squadron movement. Don't forget to make your hyperwarps short jumps to save energy. Figure 1 shows the energy units used compared to hyperwarp distances out to nine sectors. Notice the large energy increase for five sectors or more, and again over eight sectors. Once you've identified the starbase under attack, mop up the sector you are in, if you feel there is time, and move to defend your starbase.
While in an enemy sector and attempting to destroy Zylons, your objectives are survival and energy conservation. The main energy drains inside the sector result from hits from enemy photos and using the twin ion engines. By far the most important of these is avoiding being hit by enemy photons. Each photon hit costs 100 mergs (energy units) and causes damage. Damage not only reduces your chances of survival, but certain kinds of damage will mean an unplanned trip to the nearest starbase for repairs. The extra trip could cost 300 to 800 mergs or more. Eight hundred mergs is equivalent to about eight final-score points, or the difference between ranks of Star Commander 1 and Star Commander 2.
The ion engines should seldom be needed in the enemy sector. As your ship comes out of hyperwarp and coasts to a stop, three different types of enemy movements will be found: ships with no movement, fast-moving ships that will seem to approach you but then retreat, and ships coming on at full-speed attack. Notice that ships within 120 metrons (distance units) will always attack, become visible, and be within photon range.
Don't trust your tracking computer to lock on the nearest enemy vessel. If you are not immediately under attack when entering a sector, press M (the manual-tracking key) to avoid nasty surprises. If a ship is coming on at full speed, just wait for it. When a ship seems to be coming in for an attack, but then takes off in some other direction, don't chase it because that's the sucker move. Scan the sector for another ship to attack. If you have the time and patience and are willing to wait, the enemy will eventually come to you. (But don't forget that your starbase is under attack while you are waiting.) Early in the game at the Commander Level, you cannot afford to wait.
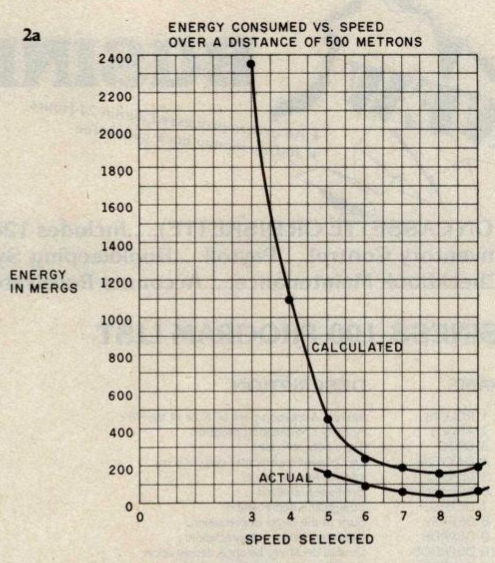
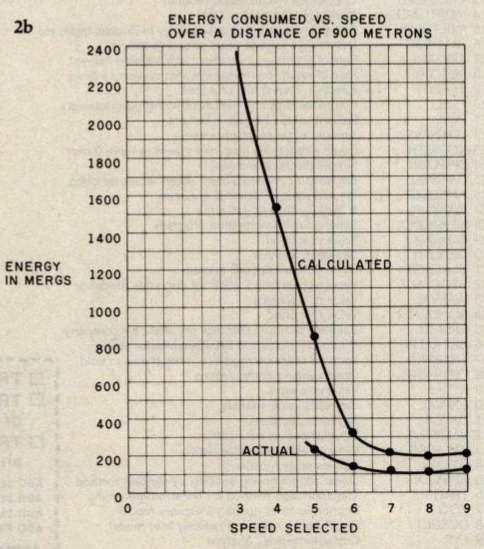
Contrary to what the user's manual tells you, speed 6 is not the most efficient way to use your ion engines. Energy requirements for shields, computers, and life-support systems must be accounted for during the journey. According to the manual, the energy drain for these systems is 2.75 mergs/centron (energy units per time unit). Although my tests show a lower energy consumption, the most efficient speed is actually 8 not 6. Figure 2 shows calculated and measured energy consumed for distances of 500 and 900 metrons. The calculated values are based on information taken from the user's manual. In either case, there is little difference in energy used for speeds above 7.
As you come out of hyperwarp and coast to a stop, you will often find yourself overrunning an enemy ship and being fired on before you are ready to defend yourself. Try this! As the ship comes within about 150 to 200 metrons, throw your ship into a hard turn in either direction. Hold the turn until the enemy has passed all the way behind you and is coming around the front again. Watch your instruments. By this time the screen will have stopped flashing, and you will be ready to fight with no distractions.
As the enemy approaches from the front, maneuver your joystick to keep him off to the side and low. The idea is, of course, to avoid photon hits and damage as he approaches. When the enemy is about 20 metrons away, swing him into your sights and blow him away. Conserve your photons — they cost energy too. Don't let the Zylon get much closer than 20 metrons before using the maneuver, because he just might zip around behind you. If two ships are attacking from the front at once, concentrate on the one closer to the center of the screen.
A word about attacks from the rear: for several weeks I tried to handle aft attacks without much success. If you can handle a frontal attack one second and an aft barrage the next (with all your joystick movements reversed), that's great; but I've found that you can still reach Star Commander 1 without mastering the aft attack. To bring an aft-attacking enemy to the front, just throw your ship into a hard spin and he will wind up in front of you. You will notice that you are almost never hit while in a spin.
The toughest situation is simultaneous front and aft attacks. You can quickly turn off autotracking (press T) to concentrate only on the front. I've already suggested how to handle frontal attacks, but in this situation throw in a small amount of back and forth joystick movement. This hurts the aim of the aft attacker.
| Priority | Name | If Damaged | If Destroyed |
|---|---|---|---|
| 1 | shields | hyperwarp at once | hyperwarp at once |
| 2 | photons | finish sector if even odds | hyperwarp at once |
| 3 | computer and sector scan | finish sector if even odds | hyperwarp at once |
| 4 | subspace radio | — | finish sector |
| 5 | computer | continue | finish sector |
| 6 | engines | continue | continue |
| 7 | sector scan | continue | continue |
How do you know when to cut and run? For some kinds of damage, there is no doubt. Some systems, however, are more important than others, so the decision is not clear cut. Table 1 is presented for your use as a guide only. Many other damage combinations are possible and are left to your judgment, skill level, and the game situation. To help explain the chart, here are some examples:
A final hint: your subspace radio is much more important early in the game than it is later when enemy ship movements are not as threatening.
What I've described here is just about all I know about Star Raider1. I hope these suggestions will be helpful to your pursuit of new and better ranking and many more hours of enjoyment. ∎
Anyone who has not been a Star Raider might not understand the fascination that envelops one when playing the game — the many hours that go into learning how to swerve away from incoming photon torpedoes, the frustration of losing control of the ship while in hyperspace and then emerging in some empty nether region of the galaxy while the dastardly Zylons surround and destroy your last starbase. Atari's Star Raider1 is the first, and so far the best, of a genre that I call "sit-in-'em" games.
Let me explain that, as a Star Raider, you are actually sitting in your ship, seeing stars, Zylons, starbases, and the rest of a vast galaxy whiz by as if you were looking out a window. Don't confuse Star Raider1 with the more common "map" games like Space Invaders or Pac-Man, where you look down at a map of yourself and your opponents. In Star Raider1, you are pilot of a one-man ship with all the expected properties of a military vessel capable of roving the galaxy: it has weapons, defenses, and communications equipment; it has inertia, it can be damaged and, when it is, you are in trouble.
Although map games have their place (as evidenced by the continuing popularity of chess), this is the type of game that best employs the power of the computer, because it uses the computer to give you capabilities that would otherwise be impossible. It puts you somewhere you could not normally go. I must admit that "sit-in-'em" games are now the only type I will stoop to conquer. My jaded imagination can no longer be excited by watching my "blip" shoot at the computer's "blip" on a screen — too impersonal.
Star Raider1 is probably the single greatest contributor to the sales of Atari's 400 and 800 series computers. People seem to buy the computer just to get the game, and then they find out that it can be useful in other ways too (but Star Raider1 still gets top priority). If you're thinking about writing a game for personal computers, Star Raider1 is the one to beat.
Here's a collection of notes and observations I have made after, literally, several hundred hours of playing the game. These tricks and considerations, as well as those Mr. Harris mentions, are the ones that I now employ whenever I play Star Raider1. If you are a beginner to the game, perhaps you might want to consider waiting to read this — a large part of the enjoyment of the game is learning how to win.
| Vermin | Zyloons |
| Villains | Zyklowns |
| Nasties | Zylarks |
| Dastard | Hey You! |
Damn the photons! Full speed ahead! . . . CPF2
From Byte Magazine, Volume 07, Number 09, "Computers and the Disabled" (September 1982).
Internet Archive scan.
h/t Rob at Player/Missle Podcast for pointing out
this article (in episode 26).
Back to the
Star Raiders Tribute
By Bill Kendrick, 1996-2021