By now you must have experienced some odd object behavior in ADT when you Move, Copy, Rotate or perform other basic editing actions which result in drastic shifts out and away from the original object location. If you have not had this experience, you are quite fortunate. In this article I will discuss the use of the old AutoCAD Point Filters (a.k.a. .X, .Y and .Z) for better modeling results in ADT.
Brief History:
Before the OTRACK tool, AutoCAD users utilized all sorts of techniques to
manage relative object positions: from drawing Line, Rays, Xlines to Offsetting or Moving
several times. If you are an old AutoCAD user I am sure you know the old tricks but
the sad side of many of those wacky tricks is that they were often unnecessary because the
Point Filters have been present for a very long time. The OTRACK tool is basically
just a derivation of the Point Filters so if you know how to us it, using Point Filers
should prove to be about as easy.
Just to start at a very basic level, let's look at how Point Filters can be used in simple 2D drawings and then expand into the complex world of 3D.
Illustrated to the right I show the process of drawing a Line that needs to stop, in space, at a point relative to another adjacent line. By typing ".x" or ".y" on the command line at the prompt for "first point" or "second point of displacement", you can indicate which position you want to match on another object. After typing .x or .y ( as illustrated to the right ), use an OSNAP (such as MidPoint ) to acquire that position in space (on another object). Once you have acquired a .x or .y value from another object, you have locked that position, in space, in and whatever you are drawing must stop along that axis. For the final task, you are really indicating the remaining two values, .yz or .xz. Since "z" is not a part of this example, it is basically irrelevant, but the .y or .x value must be specified more carefully. In the illustration to the right, I show that by using ORTHO, you can simply place the cursor straight above the original 1st point of the Line and pick anywhere as long as you don't OSNAP to some other object(s). Since the .y position, in the illustration to the right, has been set, it will not matter how high the 3rd point is specified because it will always stop at the .y position.
Though OTRACK can be used to produce exactly the same results, sometimes I find that there are too many objects in an area where I might want to get this type of result and I get too many OTRACK lines to work with. In cases like this, it's nice to have an old trick up your sleeve.
Keep in mind that Point Filters can be used anytime you are prompted to specify a point on the Command Line so this means that you can use Point Filters for Moving, Copying Mirroring and a number of other commands. Point Filters are simply a way of breaking up a point in space by its three values: .x, .y and .z.
Command line sequence:
Command: _line Specify first point: [pick where you want to start your line]
Specify next point or [Undo]: .y of (need XZ) [here's where you type .y and
OSNAP to Midpoint]
Specify next point or [Undo]: [pick anywhere above the line with ORTHO on]
Command:

When you work in 3D, Point Filters really start to shine and despite the neat features of OTRACK, it just can't compete with the Point Filters because it has no ability to deal with the Z-axis of the UCS; i.e., it's only a 2D tool. You see, the Point Filters allow for any combination of 3 points in space so you can create combinations like ".XZ" or ".YZ"
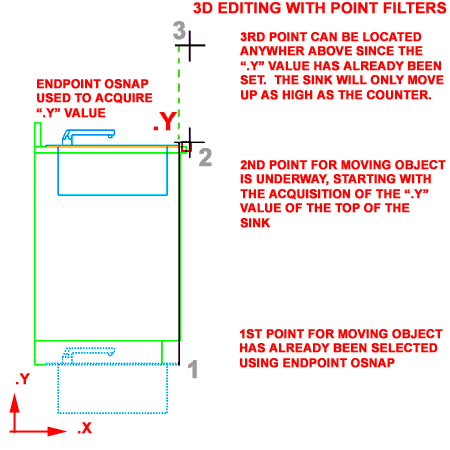
Illustrated to the right I show a classic example of how using Point Filters with 3D objects produces more predictable results than simply using the Perpendicular OSNAP. Notice that in this example I have the UCS set to match the View which typically happens automatically when you use the Right, Left, Front or Back View buttons on the View Toolbar. What this means is that Y is now point up where Z used to point ( in the World View ).
In the Illustration to the right, I show how an ADT object has been inserted on the floor instead of the proper counter height position. To correct the error using the Move command and Point Filters, you simply Move the sink by specifying the 1st Point at the base of the apron and then type .y for the second point of displacement. If your UCS icon was in World position, you would type ".z" instead of ".y" here. For the .y value, you OSNAP to the EndPoint or Intersection of the top of the countertop and you should notice that the sink gets locked to that position. On the command line you should notice a query about the need for .x and .z because all points in space require three values (x,y,z). In this example, the last two values are rather easy to input because they should not be any different than the original values. My trick here is the same that I illustrated in the example above: make sure ORTHO is on, bring the cursor straight up above the desired position, make sure that I am not OSNAPping to any other objects and Pick.
What this process achieves is the guarantee that the object being Moved will not change position in Plan so you would be sure to not end up with the sink at the other end of the cabinet or out beyond your building. When users don't use tricks like this, and simply assume that and Endpoint or Perpendicular OSNAP will do the trick, they are often surprised by the actual results. Results can vary depending upon what AutoCAD or ADT actually OSNAPs to. Using Perpendicular, for example, could place the object at the right height but at some totally different position in Plan because the Perpendicular read may have come from an object way beyond.
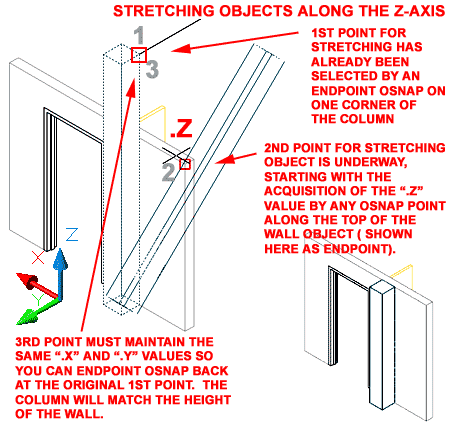
When you work with 3D objects in Plan View, you often don't realize that the Height of some objects don't match the Height of other objects until you see the relationship of all the objects in an Isometric View. It is often desirable to edit objects while viewing them in 3D but, because AutoCAD and ADT are limited by the 2D UCS, working along the Z-axis usually involves manipulating the UCS icon unless you use a ".Z" Point Filter.
Illustrated to the right I show a simple scenario where an ADT Column has been Added but has the wrong Height when viewed in an Isometric or Elevation View. If the UCS icon is set to World and you want to quickly fix the Column without using the Properties or the Object Modify dialog boxes, you can STRETCH it by following the instructions written out in the illustration to the right.
Basically, when working along the Z-axis, the tricky part is not about getting a .Z value but maintaining the original .XY values so the object does not shift in plan. The most common trick I use to maintain the same .XY values, after acquiring a new .Z value from another object, is to OSNAP right back to the original 1st Point on the object being edited. I use this technique on a daily basis because it cuts back on extra commands involving Rotating the UCS icon.
If you expand on this information, you can use this technique for a lot of editing work. You can even use this technique to start objects at a .Z value height: like Stairs.
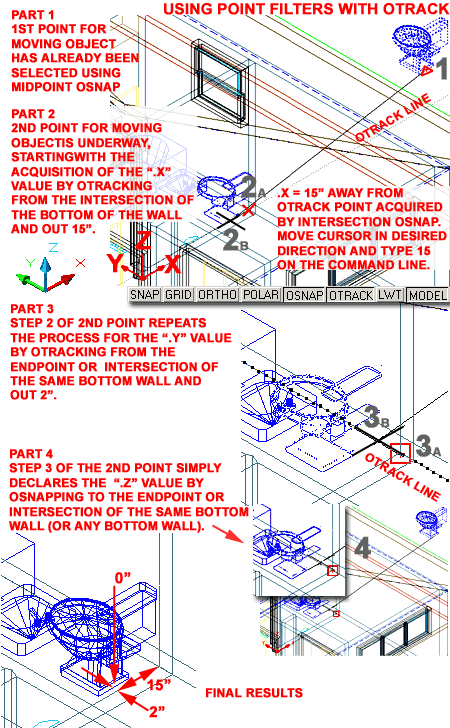
You can actually mix Point Filters with the fancy new OTRACK tool to get some pretty cool results. If you can follow the instructions illustrated to the right, you should consider yourself a master of the Point Filters and of the OTRACK tool.
The scenario is based upon the idea that there is a 3D object floating out in space that you noticed while looking at the drawing in an Isometric View. Rather than going back to Plan View and Moving the object and then going back to this Isometric View, you would like to just pop the object into the correct position and move one with your work.
Part 1:
Execute the Move command and Select the Object. For the Base Point, OSNAP to a point
on the object that you wish to control and position it from ( like the back bottom, as
illustrated ). You should now be prompted for the second point of displacement.
Part 2 - Steps 2A & 2B:
Since the UCS icon is in World position, Z is pointing straight up so we will need to
consider the three points individually. In the illustration to the right, I started
with the X-axis first. Before proceeding, make sure your OSNAPs are set to Endpoint
and/or Intersection, that OTRACK is On and that ORTHO is Off ( it doesn't track well along
orthogonal lines in isometric views ). On the command line, type ".X"
and Hover your cursor over the bottom corner of the Wall ( don't pick the point, just drop
off the OTRACK marker ), pull the cursor out in the X-axis direction that you want to
position the object in and look for the OTRACK line ( dotted ). Once you have the
OTRACK line, type the distance value for the position of the object ( relative to the wall
corner, of course ) and hit Enter.
Part 3 - Steps 3A & 3B:
Now that the X-axis position has been set, you may need to address the Y-axis position as
well. In this scenario, I show how you can move the object out along the Y-axis by
yet another OTRACK-assisted value. By repeating the steps discussed in Part 2 using
the .Y filter and moving the cursor along the Y-axis, you can now type the distance you
want the object placed from the wall corner along this axis. So, type ".Y"
on the command line and Hover the cursor over the intersection or endpoint of the Wall,
move the cursor away along the Y-axis, look for the dotted OTRACK line, type in a value (
like 2" ) and hit Enter.
Part 4:
For the Z-axis value, you can simply OSNAP to any point along the bottom of any Wall
object to establish a proper Height for the object being Moved. Once you have
OSNAPped that last ".Z" value, you should see a satisfactory result. A
little practice makes this technique work rather quickly and can often save quite a bit of
time since you won't need to change Views.