![]()
|
Kelly Moving |
|
|
I started Kelly Moving in 1997, a moving company specializing in piano moving. In 2014 I sold the company to my longtime employees, who have honored me by keeping the original name. On this page I have collected information on piano moving technique, as well as a few photos from some of my more interesting moves. Marin |
|
For Marin County or North Bay Area piano moving, call:
Kelly Moving 415-485-4421 "Experience is the most important part of piano moving." |
|
|
A piano takes flight over San Francisco Bay
Below, a half-ton, 7-foot Mason-Hamlin BB piano approaches its new houseboat home via Tom Sawyer and his raft.
|
|
Frequently asked questions about piano moving
|
|
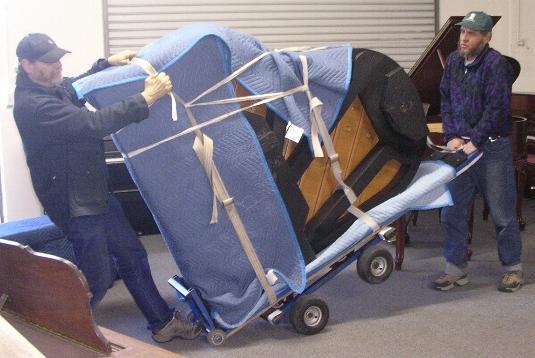
Moving a Grand Piano We use a device that piano movers call either a skid or a sled. The trick is to lay the object on its side without hurting it. The sled gives us a surface that we can drag it around on.
We remove the music desk, the stand for music that usually slides out on a track. If you don't remove it, wrap it in something to keep it from banging on the inside of the lid. Using felt or any soft cloth, plastic wrap, whatever, we wedge the fall board, the cover for the keyboard, on both sides to keep it from falling open. Then we stretch a big rubber band around the right leg, then over the lid to keep it from falling open when we put the piano on its side.
Before putting the piano onto the sled, place a clean, folded moving pad on the sled to protect the finish on the side of the piano. Because you will have to slide the piano around on the sled to adjust the balance, any grit or dirt on the pad can scratch the finish. Make sure you have enough sled for your piano. Pianos and sleds come in several sizes between five and nine feet, and too long is better than too short. There are several methods for tipping the piano onto its side on the sled. Some piano movers remove one leg and tip the piano on the lyre, the framework that supports the pedals. This can damage the lyre and the piano companies do not recommend this practice. We prop the piano up on a special stand made by our equipment supplier, then remove the left front leg and the lyre. With the lyre and the leg removed, we remove the stand and set the corner of the piano on the sled. Once the corner of the piano rests on the sled, we tip it the rest of the way onto its side, slide it into a balanced position, and remove the remaining two legs. For some pianos it is important to replace the legs in the same positions. The legs are usually numbered with #1 the left front, #2 the right front and #3 the rear leg, but some companies number them differently. Look for the number stamped on the leg and on the cabinet. If there are none, mark them so you can replace them correctly.
The most common means of attaching the legs involves a metal plate with a tapered slot attached to the piano, and a matching shaped metal part that fits into the slot attached to the end of the leg. Once you push the leg into the narrow end of the slot, it can't come out. Either screws or some sort of cam arrangement keeps the leg positioned in the slot. Many newer grand pianos have hexagonal or square bolts holding the legs, requiring a socket set with some large sockets.
If the leg is held into the slot by a cam, it's easy to figure out which way you need to move it to take it off; you just pull the cam out of the way and smack the leg with a rubber mallet toward the cam. If it is held in by screws, you have to take out the screws and figure out which way the slot faces, then smack it with the rubber mallet. Usually if there are two screws in the leg, the keyed slot faces either the front or rear of the piano, although there are pianos which require that the leg be turned a quarter-turn to remove it. Good luck.
If you see a piano with round legs, and especially if it is an old piano, the legs probably screw on with a thick, threaded dowel. If this is the case you will not find any screws or cam arrangement. You just grab the leg and turn.
We use a straight-line pneumatic dolly. This dolly does not have swiveling wheels, so in order to turn, you pick up one end of the piano. It's not as hard as it sounds, because movers at each end of the piano can help each other by pressing down on the end opposite the end being lifted. It takes a little practice to find the balance point to set the dolly. Because this dolly always rolls in a straight line, it is easier to control, and the big soft wheels roll over any surface, without marking delicate floors. Sometimes inside a house we need to turn tight corners, and there we use a swiveling dolly to maximize maneuverability.
|
|
Caroline was so happy to get a piano that she drew me a thank you note. |
|
On New Year's Eve, 2005, a flood devastated the Ross Valley. A mudslide crushed part of this house, blocking the door in the background that we had used to bring in the Steinway 7-foot concert grand piano. The piano was unharmed, but the home-owner had to cut a hole in a wall of his (formerly) $1 million house with a chainsaw in order for us to remove the piano. |
|
I have here another method for moving a grand piano, written by John Tuttle and used here with his permission. This is not the way I move pianos, because it takes longer than our methods, but it's more foolproof if you don't move a lot of pianos.
John Tuttle's Piano Moving Method The correct equipment includes two cinder blocks, a manual floor jack (or correctly sized 4" X 4"), a skid board, three stair rollers, a 7 ft. ramp, a dolly, and lots of movers straps and blankets. You should also have a socket set, an assortment of screw drivers and a leather mallet or rubber hammer (for legs/lyres that are 'wedged'). Next, the lyre and left leg should ALWAYS be removed from EVERY grand piano before the piano is tipped. The lyre was never designed to support the weight of the instrument... Period! Armed with the above tools and equipment, Step One is to remove the left leg and support the weight of the piano with the jack (or 4" X 4") such that the piano is about 6" higher on the left side than when it's resting on its leg. This provides enough clearance to easily remove the lyre even if you're moving a grand with the Ampico mechanism, which has the pneumatics in the box that's attached to the top of the lyre. (The lyre on most regular grands comes off easily before the left leg is removed. So there is no need to elevate the piano any higher than the leg.) Step Two is to remove the lyre, insuring that the screws or bolts used to secure it in place do NOT get mixed up. In some cases, the screws/bolts are different lengths. Mixing them up can be a recipe for problems when putting the unit back together. Step Three: Place the skid board on the cinder blocks (see picture). Place one block at the front of the board and the other approximately four feet from the front. This provides adequate room to put the dolly under the board. (Elevating the board 8" off the ground provides adequate clearance for the stack, which hangs down from the underside of the instrument approximately 6"-7". Adding to that the height of the skid board (about 2"), this gives you at least 2"-3" of free air space between the stack and the floor when the instrument is tipped down onto the board.) Also, if you're moving a unit that has the 'aprons' around the stack, they should be removed before the leg and lyre are taken off. Here again, make sure all of the screws are kept in their correct orientation. Step Four: Tip the instrument onto the board such it contacts the board approximately 2-3 inches from the front of the board (near the lip) and 2-3 inches 'in' from the right hand edge of the board (see picture - red 'X' marks the spot). Step Five: Continue tipping the instrument over until it is standing upright on the skid board. Once you have a little experience, you'll find that the board has to be placed at an angle to the piano such that when it's tipped all the way onto the board it will be squarely on the board. You'll also discover that it actually requires much less effort (work) to tip the unit because gravity isn't working against you quite as hard as it does when the piano has to be let down to the floor. Step Six: Blanket the piano and strap it to the skid board. Make absolutely certain that the straps DO NOT contact the stack or any of the other parts of the player mechanism.... Period!! Step Seven: With the piano dolly in the correct position under the skid board (and between the two cinder blocks), lift the back end of the skid board and remove the rear cinder block. Then lift the front end and remove the front block. That's it! When setting the instrument back up, reverse the above procedure. Although it is a bit precarious, the above steps can actually be done by one person. I know because I've done the job all by myself in the shop. The two tricks are a stable floor jack (manually operated) and the two cinder blocks.
You can find more intense detail about pianos than you ever cared to see at Jack's website, Player Care.
|
|
Piano Links |
|
|
Mike McQuilkin sells new and used pianos in Novato, CA. |
|
|
J.B. Company in San Rafael, fine pianos and great restoration. |
|
|
The best piano moving equipment in the world. |
|
Home | Mountain Bikes | Fat Tire Flyer | APHIDS | Sons of Champlin | Reprints | Links |
|
|